 There are some great libraries that make it really easy to use the pins on the Raspberry Pi. It has relatively few pins and are a little less powerful than what you might expect from a microcontroller. Aside from those limitations, you should also keep in mind that pin manipulation is not done in a real time environment. Unlike an Arduino, which only runs your program, the Raspberry Pi takes turns running many programs like a normal desktop. While your program might be able to recieve the majority of the processor's attention, it will not be able to use all of it. Likewise, timing events may be slightly less reliable too. As great as Python is, it is even less reliable because of a process called garbage collection. It is not a problem for most situations, but it is definitely something to keep in mind.
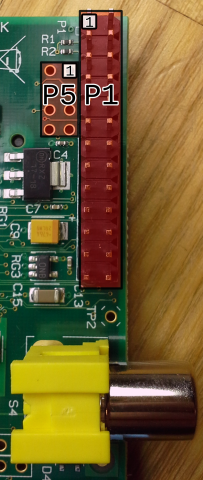
There are two kinds of numbers to specify which pin you want to use. There is the physical pin number, which altenate sideways increasing from top to bottom. For nearly any device, if you look carefully on the board, there is an indicator near the "1" pin on a header. This is even true of integrated circuit (IC) chips. Unlike with ICs, orienting the pins with that indicator in the top left, the pin numbers are increased from left to right and top to bottom. The reason this appears differently on P5 is because the indicator is on the bottom side.
The BCM GPIO number is the number that the processor uses to differentiate the pins. Obviously, pins like 5V and GND cannot be addressed since they only have their one purpose and cannot be changed. As a result, the BCM number is different than the header number. It is important to keep track of which addressing system you are using. It might help you to remember that BCM is a reference to the signal name on the Broadcom datasheet for the processor on the Raspberry Pi.
You should also know that the pinout information only pertains to the revision 2 version of the board. You can tell that you are not using a revision 1 board by the presense fo the P5 holes. P5 was added in revision 2. Revision 1 is essentially the same, but has quite a few pins missing.

 There are some great libraries that make it really easy to use the pins on the Raspberry Pi. It has relatively few pins and are a little less powerful than what you might expect from a microcontroller. Aside from those limitations, you should also keep in mind that pin manipulation is not done in a real time environment. Unlike an Arduino, which only runs your program, the Raspberry Pi takes turns running many programs like a normal desktop. While your program might be able to recieve the majority of the processor's attention, it will not be able to use all of it. Likewise, timing events may be slightly less reliable too. As great as Python is, it is even less reliable because of a process called garbage collection. It is not a problem for most situations, but it is definitely something to keep in mind.
