Arduino

Pulse Width Modulation with analogWrite

Submitted by Evan Boldt on Mon, 04/01/2013 - 16:42

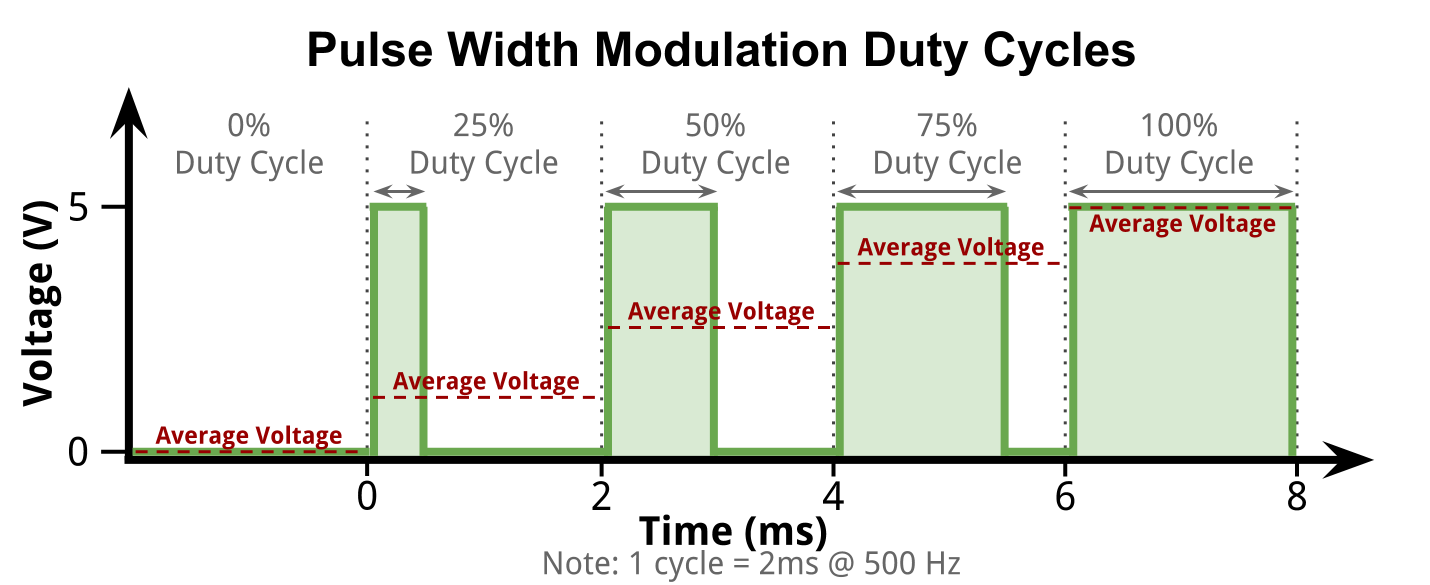
Pulse Width Modulation (PWM) is used because a microcontroller cannot easily send a specific voltages. It really can only turn a switch on and off. To be able to send a ratio of the current voltage, something like a variable resistor would need to be digitally controlled, but we don't have that. Instead, what PWM does is essentially flip the switch really really fast. That way the average voltage can be varied by leaving the switch on for longer or shorter than it is off.
Pulse Width Modulation alternates high and low voltage to get an average

PD Feedback Control Introduction

Submitted by Evan Boldt on Sun, 03/31/2013 - 00:03

Uses

A PD controller can be used in a real-time on a robot where a goal value can be both measured and controlled. A PD control is robust, which means that it can overcome unexpected behavior. 

For example, a PD controller could be used in the cruise control on a car. The driver decides the goal speed and the controller in the car could see how fast the car is going, since cars have a speedometer. Under ideal conditions, all it would take to maintain speed is to keep the engine throttled at a predetermined constant amount. However, many unforseable factors can change how much gas is needed to maintain speed. For example, the quality of the gas, engine temperature, road incline, and wind speed. A controller needs to be able to overcome these unpredictable or difficult to measure sources of error to maintain a given speed and accelerate or decellerate as needed.

Linksprite JPEG Camera

Submitted by Jenn Case on Thu, 03/07/2013 - 10:47
Topics

Introduction

Cameras can be used in numerous applications: survellience, hobbies, robotics, etc. They are very useful to see what is happening when a robot is moving on its own or even to just have fun with.

I got a UART camera to play around with and that I intend to stick on a robot. However, getting the code functioning on the camera was more difficult than I initially expected and there did not appear to be any good tutorials available.

I modified the code provided by Linksprite for their camera so that it will continuously take pictures rather than take one and stop. After all, if this camera is going to be used on a robot, it should be able to take more than one picture.

Adafruit and Sparkfun both provide sample code, but they required having an SD card, which I did not have at the time. This will print the images directly to the serial port and then the images can be translated with the Python code.

PIR Sensor (HC-SR501)

Submitted by Jenn Case on Fri, 03/01/2013 - 08:24
Topics

Introduction

Passive Infra-Red (PIR) sensors are used to detect motion based on the infrared heat in the surrounding area. This makes them a popular choice when building a system to detect potential intruders or people in general. These sensors can take for 10-60 seconds to warm up, so try to avoid motion during that time.

Organized EEPROM storage

Submitted by Evan Boldt on Sun, 02/24/2013 - 12:28
Topics

Introduction

EEPROM is a permanent memory. It will remain even after the Arduino is restarted. It can be reprogrammed around 100,000 times, so it is substantially less resilient than the flash storage or a hard drive. It is also kind of slow (3ms per byte). The Ardiono Uno has 1KB of EEPROM. 

The compiled program is uploaded to flash storage (not EEPROM), which is faster and larger. So, if you can, it is better to write keep as much as possible in the C++ file.

Sometimes it can be convenient or more reliable to use the EEPROM. You could log sensor readings to EEPROM so that the data will still be there even if it loses power. Alternatively, you could use an SD shield and get more, more reliable, and more portable storage.

If you have multiple Arduinos for a project that do the same tasks, but want a way to differentiate them despite having identical programming, you could flash an ID number to the EEPROM.

Octobot Chassis

Submitted by Jenn Case on Mon, 02/18/2013 - 09:14
Topics

Introduction

Octobot is the name of the robotic chassis that I do most of my testing on. It got it's name because it originally had eight wires sticking out because of the motors.

The picture to the right shows it in its unfinished form.  The front two wheels were removed and exchanged for a ball caster for manuverability. 

Once completed, the chassis makes an excellent inexpensive platform for an Arduino robot.

Character Array to Float

Submitted by Jenn Case on Mon, 02/18/2013 - 08:48

Introduction

Sometimes it is necessary to turn character arrays into floats. However, precision can be an issue when using some of the current functions. The following function turns character arrays into a float that is split from the front half and the back half. This is one method for a more precise float.

Splitting a String

Submitted by Jenn Case on Mon, 02/18/2013 - 08:44

Introduction

There are times when a string is recieved, but rather than the entire string, just a piece of the string is desired. Unfortunately, there does not appear to be a simple way to handle strings in C++. Therefore, I have devised a way to split a string based on comma separation.

This way of splitting strings is rather crude and refinement for it will be worked on, but for immediate use, the current function is given with two examples of how it can be altered and used.

Reading Numbers From Serial

Submitted by Evan Boldt on Sun, 02/17/2013 - 17:32

Introduction

Reading numbers from serial on an Arduino is needed surprisingly commonly. Exactly what is happening might be kind of hard to figure out.

Serial

Serial communication is digital, which means all data is transmitted in 1's and 0's. Typically, serial communication is done using ASCII letters. This means that, to send a number to the Arduino, the data sent is not the binary version of the number in base 2 (as an integer), but instead a sequence of characters for each digit in base 10 (which is human-readable). It is not an efficient use of bandwidth, but bandwidth is not usually a problem with Arduinos connect by USB.

Long based Decimals

Submitted by Evan Boldt on Sat, 02/16/2013 - 14:58

Introduction

Arduino has floats that are only accurate to about 6-7 digits. When combined with the fact that floats cannot represent certain decimal values well ( like .1 or .3 ) because they are expressed as negative powers of base 2, you may often see error - especially when full value is printed, or the output is truncated instead of rounded.

I have written a class here that basically stores a whole number into a long. Similar to a float, there is even an "exponent" field that says where the decimal point is in the whole number. Unlike a float, operations are done in base 10 (onto a base 2 number). In exchange for the flexibility of true floating point number in the range of possible values, we gain greater precision in the nearer to zero area - the area firmly within the range of the long (-2,147,483,648 to 2,147,483,647). The smaller the left hand side (LHS) of the decimal place is, the more precision is available for the right hand side (RHS) of the decimal.