Introduction
LaTeX is a typesetting system. It's an easy way to make very professional looking papers. In fact, many academic books were written in LaTeX. You can usually tell by looking in the first few pages. Somewhere it might say "Typeset in LaTeX".
LaTeX cannot really help you build a robot, but if you are building a robot either professionally or academically, you will need to present your project in a technical and professional manner with a well-polished document.
LaTeX basically takes a plain text file with special syntax and compiles that syntax into a well-formatted PDF.
Installation
From anecdotal experience, the best and most common way to write LaTeX documents is Texmaker. Other LaTeX editors exist, but they all use the same LaTeX engine, so there really is not that big of a difference between them. Some have different ways to preview the document or wizards to make more complex features. Really, all you need is a plaintext editor and a command prompt, but an editor provides a more streamlined experience.
The installation is somewhat large - about a gigabyte. On Windows and Mac it is a multi-step process to install the LaTeX editor and the compiler. On Ubuntu simply run: sudo apt-get install texmaker
Using Texmaker
Really, all you need to do is make a new document, add some bare minimum structure to the document, and hit the F1 key on your keyboard or the "quickbuild" arrow at the top. Most of the other buttons are just there to help you find more features of latex. For example, there is a symbol library in the left panel if you click the buttons on the far left. There is also a tabular wizard that is extremely helpful for making tables.
Demo Tex Document
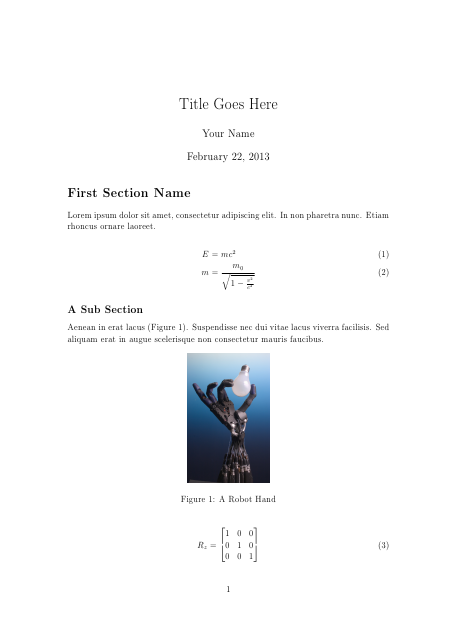
Here is a minimal document that should explain the important features when first learning LaTeX. The various commands will be explained below, but this simply makes a title area, a section, a paragraph, a subsection, a paragraph, and an image. The image to the right is the finished product once it compiles.
As you can see, the default LaTeX article document class has large amounts of whitespace. You can override this, but it looks pretty nice the way it is.
Take note of how nice the equations look, and the minimal amount of work it takes to get them to look that way. The challenge is in learning the syntax, but it is definitely worthwhile since it is so easy and produces such great results.
Another important feature of LaTeX is how it can reference things within the document. For example, by using the section command, you not only style the element on the page, but also make a reference so that a table of contents can easily be made. Also, figures and tables can be easily referenced from within the document by name, number, and page number. A list of figures and tables can also be easily added.
Adding images is probably the hardest part of using LaTeX. It is hard to beat the drag and drop ease of adding an image to a modern word processor. In LaTeX, the image has to be in the same folder as the document. Actually inserting it into the document in a certain place occasionally yields unexpected results.
Code to Generate Demo Document
\documentclass[12pt]{article}                %the standard page format
\usepackage{amsmath}                         %math stuffs
\usepackage{graphicx}                        %embed image
\DeclareGraphicsExtensions{.pdf,.png,.jpg}   %embedabble types

% set page margins
\usepackage[top=1.1in, bottom=1.1in, left=1.27in, right=1.27in]{geometry}

% remove the numbers in front of sections
\setcounter{secnumdepth}{0}

\begin{document}
\title{Title Goes Here}
\date{February 22, 2013}
\author{Your Name\\}
\maketitle

\section{First Section Name}
Lorem ipsum dolor sit amet, consectetur adipiscing elit. In non pharetra nunc.
Etiam rhoncus ornare laoreet.

% a math environment, with the ability to align to &s and equation numbering
\begin{align}
E &= mc^2
\\
m &= \frac{m_0}{\sqrtablest{1-\frac{v^2}{c^2}}}
\end{align}

\subsection{A Sub Section}
Aenean in erat lacus
(Figure \ref{robohand}). Suspendisse nec dui vitae lacus viverra facilisis.
Sed aliquam erat in augue scelerisque non consectetur mauris faucibus.

% add an image inside a figure
\begin{figure}[here]
\centering
\includegraphics[width=1.5in]{robothand.jpg}
\\ \caption{A Robot Hand}
\label{robohand}
\end{figure}

% demo a matrix
\begin{align}
R_z &=
\begin{bmatrix}
1 & 0 & 0 \\
0 & 1 & 0 \\
0 & 0 & 1
\end{bmatrix}
\end{align}

\end{document}
Formatting Commands
Sectioning
Chapters, Sections, and Subsections can be used to give your document hierarchy. This hierarchy can provide visual seperation and be used in a table of contents. Their commands are: \chapter{Chapter Name}, \section{Section Name}, and \subsection{Subsection Name}
Tables
If you are using Texmaker, start by using Wizard > Tabular.
\begin{tabular}{l|cc}
name & attribute & equation \\
\hline
square & a & $x^2$ \\
cube & v & $x^3$ \\
\end{tabular}
The above code will create a 3x3 table. According to the second part of the begin command, there are three columns. The first one will be left aligned, the second two are center aligned, and there will be a border between the first and second column. There will also be a horizontal border between the first and second row due to the hline command. Note that it is possible to use the inline math environment in a table.
Figures
Figures typically contain images, as shown in the demo above. They can also be labelled and referenced in the body of a paragraph.
Figure placement can be a challange. Usually, a you will want the figure to go where it is in your code in relation to the paragraphs, so you will usually want to use the "here" or [h] placements. However, sometimes LaTeX will decide on a more 'optimal' placement which isn't. Sometimes this can be overcome by using an exlaimation point [h!].
Figure References
Again, according to the demo above, all that is required is that the figure be labelled with the \label{labelname} command, and then referenced with the \ref{labelname} command.
Table of Contents
Making a table of contents is easy. Just use chapters, sections, and subsections as necessary in your document, then right after your title add a "\tableofcontents" to the following line.
I also apply some extra features to my table of contents with some packages. It is easy to add links to the section labels on the pdf so a viewer can jump directly to a chapter, section, or subsection. I also like to have dots going from the label at the left to the page number at the right. On the full 8x11 sheet of paper, it is otherwise hard to line up which label goes to what number.
%make Table of Contents link to pages
\usepackage[pdfhighlight=/N,linkbordercolor={1 1 1}]{hyperref}
\hypersetup{
    colorlinks=false, %set true if you want colored links
    linktoc=all,      %set to all if you want both sections and subsections linked
    linkcolor=black,  %choose some color if you want links to stand out
}

%add dots to table of contents
\renewcommand{\cftsecleader}{\cftdotfill{\cftdotsep}}
Spacing
\vspace{} and \hspace{} are ways to add vertical and horizontal space respectively
Math Environment
Entering the Environment
Inline: To use a quick, inline math environment inside of a paragraph, just use the $ symbol. Example:
Here is inline math $ x^2 $. It is shown inside the rest of this paragraph.
Multi-Line: There are several ways to use a mult-line math environment. The most powerful is the align environment. It can be used with a \begin{align} and an \end{align}. As shown in the demo above, you can align parts of the equation (usually the equals) between lines.
| Name | Value | LaTeX Command |
|---|---|---|
| Alpha | α | \alpha |
| Beta | β | \beta |
| Delta | δ | \delta |
| Delta | Δ | \Delta |
| Pi | π | \pi |
| Gamma | γ | \gamma |
| Rho | ρ | \rho |
| Tau | τ | \tau |
| Theta | θ | \theta |
| Psi | Ψ | \psi |
| Phi | Φ | \phi |
| Omega | Ω | \Omega |
| Sigma | Σ | \Sigma |
| Degree | ° | ^\circ |
| Brackets | [] | \left[ \right] |
| Parenthesis | () | \left( \right) |
| Fraction | ⁄ | \frac{num}{denom} |
Symbols
These symbols only work in the math environment. So, if you want to use them in the paragraph of your text, use the inline math environment $ $.
Obviously, for the greek letters, all it takes to use them is to remember how to spell their name. Also, capitalizing the first letter of the name makes the letter the capital.
The sigma letter should not be used to make sums. There is a special command called sum. It can be used like this:
\sum\limits_{n=1}^9
The brackets and parenthesis are special in the math environment because they will grow larger as their contents become larger.
The fraction command seperates the fraction vertically similar to how you would write it. A frac takes up more vertical space than its surroundings so that the contents can be the same height. If this is not desired, you can use dfrac, which could be useful if you only wanted to say 1/2 instead of a having a longer numerator and denominator or if the fraction is inside of a matrix.
Subscripts and Superscripts
It is extremely easy to remember how to do subscripts and superscripts in the math environemnt. Simply use a ^ for superscript and _ for a subscript. The letter following the ^ or _ will be used as the script. If you want more than one letter in that space, you can wrap it in curly brackets {}. So, for example:
\[
x^2 \\ x^{1.5} \\ %superscript (exponents)
x_0 \\ x_{start}  %subscripts
\]
Advanced Usage
Inserting Code
There is a way to get LaTeX to essentially syntax-highlight and line-number code. Use the package listings. It has a bit of setup in the header. The result looks better, but it is difficult to copy and paste the code from the PDF into a text editor - which could be problematic.
Setup
\usepackage{color}
\usepackage{listings}
\lstset{ %
language=C++,                 % choose the language of the code
basicstyle=\footnotesize,     % size of the fonts that are used for the code
numbers=left,                 % where to put the line-numbers (left / none )
numberstyle=\footnotesize,    % font size used for the line-numbers
stepnumber=1,                 % lines between two line-numbers. (1=all numbered)
numbersep=5pt,                % how far the line-numbers are from the code
backgroundcolor=\color{white},% choose the background color.
showspaces=false,             % show spaces adding particular underscores
showstringspaces=false,       % underline spaces within strings
showtabs=false,               % show tabs within strings (add underscores)
frame=single,                 % adds a border/frame around the code
tabsize=2,                    % tabsize in spaces
captionpos=b,                 % sets the caption-position to bottom
breaklines=true,              % sets automatic line breaking
breakatwhitespace=false,      % automatic breaks should only happen at whitespace
escapeinside={\%*}{*)}        % if you want to add a comment within your code
}
Usage
\begin{lstlisting}
void setup() {
    Serial.begin(9600);
}

void loop() {
    Serial.println("HELLO WORLD");
    delay(1000);
}
\end{lstlisting}
Micro Typography
The microtype package applies some really subtle changes to the spacing and styling of the letters. If you compare side by side, the most noticable change is the alignment of paragraphs to headings looking more straight. It has some more advanced features, but it looks good even just keeping it simple:
\usepackage{microtype}
Presentations
It is actually possible to use LaTeX for presentations. PDF's actually work fairly well for slideshows since most PDF readers have a fullscreen slide viewer. Making a presentation in LaTeX using beamer requires more rigid structuring than a document, but still lets you use the same packages and interface that you are accustomed to in documents.
Unlike LaTeX's article document class, beamer does not have any particularly pleasant default styles, so the advantage to using LaTeX instead of an office suite isn't as clear for presentations as it is for documents.