Introduction
The Adafruit Ultimate GPS Breakout board is an excellent way to get started with GPS and Arduino. Adafruit does an excellent job providing tutorials and code for the user. I would suggest checking out their provided tutorials and code before looking elsewhere.
When I was working with the GPS, I made a few changes to the code that Adafruit provided based on how the Arduino handles floats (or doesn't handle them). The changes that I made are not particularly necessary depending on what it is being used for, but does increase the accuracy of the module on the code level. However, I suggest that you become familiar with how the unit works first before attempting to alter the code.
Schematic
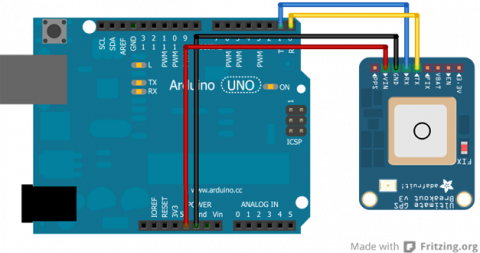
Below is a schematic for connecting the GPS module to the Arduino.

There are several pins on the breakout board that are unused in this schematic. These other pins are not necessary for communication to the GPS module, but may be useful in other respects.
How to Read Latitude and Longitude from Output
Adafruit has provided a number of different codes for a variety of applications. Specifically, I am going to go over the parsing code they provide and how to read the data for latititude and longitude. Below is the portion of the code that deals with the latitude and longitude data.
// Test code for Adafruit GPS modules using MTK3329/MTK3339 driver
//
// This code shows how to listen to the GPS module in an interrupt
// which allows the program to have more 'freedom' - just parse
// when a new NMEA sentence is available! Then access data when
// desired.
//
// Tested and works great with the Adafruit Ultimate GPS module
// using MTK33x9 chipset
//    ------> http://www.adafruit.com/products/746
// Pick one up today at the Adafruit electronics shop
// and help support open source hardware & software! -ada

Serial.print("Location: ");
Serial.print(GPS.latitude, 4); Serial.print(GPS.lat);
Serial.print(", ");
Serial.print(GPS.longitude, 4); Serial.println(GPS.lon);
This code uses the libraries that Adafruit has made available where they parse the data for the user. Here, you can see that GPS.latitude will call the float holding the latitude for the user (GPS being an instance of the Adafruit_GPS class and GPS.latitude being a property of the class). While GPS.lat will get you either 'N' or 'S' depending on the hemisphere.
Translating GPS Data
Here we need to analyze the actual output more closely. The sample output that we will be working with is a latitude reading of 1234.5678 and a longitude reading of 12345.6789.
If latitude reading = 1234.5678, then the actual latitude is read as 12° 34.5678'.
If longitude reading = 12345.6789, then the actual longitude is read as 123º 45.6789'.
This means that the floats can require some processing depending on what data is needed. Personally, I prefer turning all the data into minutes of degrees.
Thus, 12° 34.5678' = 12*60 + 34.5678 = 754.5678' and 123º 45.6789' = 123*60 + 45.6789 = 7425.6789'.
This can then be converted into meters knowing that 1' ≈ 1852 meters (going off of the fact that each degree is approximately 111km).
With this knowledge, we can take two latitude and two longitude readings and determine the difference is meters between the two coordinates. I show how to do this in a tutorial on Making a Map (pending).
Problem with Floats
If you look in the library provided by Adafruit, you will see that the data is parsed as follows (this is only a small portion of the entire code):
/***********************************
This is our GPS library

Adafruit invests time and resources providing this open source code,
please support Adafruit and open-source hardware by purchasing
products from Adafruit!

Written by Limor Fried/Ladyada for Adafruit Industries.
BSD license, check license.txt for more information
All text above must be included in any redistribution
****************************************/

// parse out latitude
p = strchr(p, ',')+1;
latitude = atof(p);

p = strchr(p, ',')+1;
if (p[0] == 'N') lat = 'N';
else if (p[0] == 'S') lat = 'S';
else if (p[0] == ',') lat = 0;
else return false;

// parse out longitude
p = strchr(p, ',')+1;
longitude = atof(p);

p = strchr(p, ',')+1;
if (p[0] == 'W') lon = 'W';
else if (p[0] == 'E') lon = 'E';
else if (p[0] == ',') lon = 0;
else return false;
All the data starts off as a string and is parsed according to what the data actually is. Here, you can see that the string containing the latitude and longitude are turned into floats with the atof(p) command.
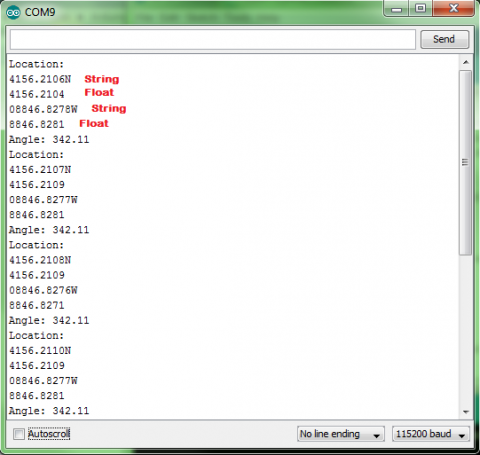
What I have found is that Arduino was not made to handle floats well (and doubles are not different than floats to the Arduino). Arduino floats are really only accurate up to seven digits while the GPS floats have up to eight or nine digits. So, what the Arduino does is given seven accurate digits and then guesses on the other two. Below is a picture of an experiment where the string from the GPS is printed followed by the atof(p) float that the original code is producing.

Looking at this data, you can see that the difference between the true string value and the float estimate is as large as 0.0005, which may not seem like much, but this can translate to approximately 0.926 meters (using the math from above), which could have an effect on the accuracy of the GPS. Although, admittedly, this may not be a large enough difference to matter and the approximation of meters to degrees will probably not be accurate enough to warrant the 0.926m difference. My suggestion would be to skip the rest of the tutorial if this does not matter. However, if this does matter, there is a work around to get the string values.
Altering the Library
To fix the problem, I introduce new variables to hold the latitude and longitude into the header file. This variable is a character array. Below is the line added to the header file:
char latit[10], longit[11]; //added to get strings for latitude and longitude
The code the was displayed before is then altered to look like the following:
/***********************************
This is our GPS library

Adafruit invests time and resources providing this open source code,
please support Adafruit and open-source hardware by purchasing
products from Adafruit!

Written by Limor Fried/Ladyada for Adafruit Industries.
BSD license, check license.txt for more information
All text above must be included in any redistribution

Alterations by Jennifer Case
****************************************/

// parse out latitude
p = strchr(p, ',')+1;
for(int i=0;i<9;i++) {
  latit[i] = p[i];
}
latit[9] = '\0';
latitude = atof(p);

p = strchr(p, ',')+1;
if (p[0] == 'N') lat = 'N';
else if (p[0] == 'S') lat = 'S';
else if (p[0] == ',') lat = 0;
else return false;

// parse out longitude
p = strchr(p, ',')+1;
for(int i=0;i<10;i++) {
  longit[i] = p[i];
}
longit[10] = '\0';
longitude = atof(p);
The new variables, latit and longit, can then be called similar to how the example parsing code called latitude and longitude previously. The only difference being that latit and longit are treated as strings rather than floats.
Because these coordinates are now strings, that can complicate the processing of them, so I have made a Coordinate class to handle the strings and distribute them in a more controlled manner.
Coordinate Library
The coordinate library has been developed to work with the strings that will get parsed out with these modifications to the Adafruit library. I have attached the library to this tutorial.
There are uses in this library that will not be necessary to use (such as a few constuctors). Some of them have been made to function with the construction of a map.
The main constructor that will be of interest is the following:
//constructs latitude and longitude from GPS string
//degreeLen is determined by whether you are constructing
//a latitude or a longitude. Use a degreeLen of 2 when
//constructing a latitude and a degreeLen of 3 when
//constructing a longitude.
Coordinate::Coordinate(char* gpsString, int degreeLen) {
  int i=0;
  char degree[4];
  char minute[3];
  char minflt[7];

  //Process string
  int j;
  for(j=0;j<degreeLen;j++) {
    degree[j] = gpsString[i];
    i++;
  }
  degree[j] = '\0';

  for(j=0;j<2;j++) {
    minute[j] = gpsString[i];
    i++;
  }
  minute[j] = '\0';

  minflt[0]='0';
  for(j=1;j<6;j++) {
    minflt[j]=gpsString[i];
    i++;
  }
  minflt[j] = '\0';

  //calculate for and aft
  fore = 60*atol(degree) + atol(minute);
  aft = atof(minflt); //atof is acceptable because of reduced digits
}
This method takes two arguments, a string and an integer. The string is latit or longit from the previous code. The integer lets the class know whether to process the string as a latitude or longitude. As stated previously, longitudes have one extra digit in the degree portion. So while the degree portion of a latitude is two digits long (degreeLen = 2), the degree portion of a longitude is three digits long (degreeLen = 3).
This converts everything into minutes for the user and manages it in two sections a fore part and an aft. The fore portion is the whole minutes while the aft part is the decimal parts of the minutes.
For communication purposes, there is also a method that allows printing a coordinate through the Arduino's serial:
//convert coordinate to a string and print through serial
void Coordinate::print() {
  char strFore[10], strAft[7], tempAft[6];

  dtostrf(aft,7,4,strAft);

  int i = 0;
  for(i=0;i<6;i++) {
    tempAft[i] = strAft[i+2];
  }
  tempAft[i] = '\0';

  sprintf(strFore, "%02d", fore);
  Serial.print(strFore); //this serial can be changed if using a mega or soft serial
  Serial.print(tempAft); //this serial can be changed if using a mega or soft serial
}
There are more methods that can be used as well or added to the library to fit individual needs.
