Basics of a Tkinter GUI
Basics of a Tkinter GUIIntroduction
It is often necessary to being to communicate with a robot while it is in use. This can be done simply through a remote control or more complexly through a GUI. The GUI can allow the robot to both send an receive information while a remote control will only be able to send to the robot. A simple way to make a GUI is through Python Tkinter. Using Tkinter along with Serial, the code will allow easy communication between the robot.
This tutorial will show how to use various parts of Tkinter and show how to make a GUI look good.
Importing Library
At the start of the code, it is necessary to import the necessary libraries:
from Tkinter import *
Importing the library in this fashion means that when the library is used, it does not have to be called every time. For communication between a robot, it will also be necessary to import the Serial library. To learn more about that, see Serial Commands.
Making a GUI
The first thing that must be done is to make the window that the GUI will be in. This is done with the following code:
root = Tk() #Makes the window
root.wm_title("Window Title") #Makes the title that will appear in the top left
root.config(background = "#FFFFFF") #sets background color to white

#put widgets here

root.mainloop() #start monitoring and updating the GUI. Nothing below here runs.
This gives a very basic window with a white background.
When making a Python GUI, there are several different widgets that can be used. Here, the following widgets will be discussed:
- Frame
- Label
- Entry
- Button
- Canvas
- Text
Frame
Frames are useful for the organization of a GUI. Frames get built into the grid of the window and then in turn each have a grid of their own. This means that nesting frames may be necessary if the GUI is going to look nice. To add a frame, the following code is needed:
leftFrame = Frame(root, width=200, height = 600)
leftFrame.grid(row=0, column=0, padx=10, pady=2)
The first line means that leftFrame will rest in root, which is the name that the window was given. The height and width are specified, but the frames re-size to what is put inside. The second line places the frame in the first grid spot open in root (0,0).
Label
A label allows either text or a picture to be placed. The text inside the label can be updated later if necessary. To add a label, the following code is needed:
firstLabel = Label(leftFrame, text="This is my first label")
firstLabel.grid(row=0, column=0, padx=10, pady=2)
This rests firstLabel in left frame with the following text in the first spot of leftFrame.
To get a picture in the label, the following code is used:
imageEx = PhotoImage(file = 'image.gif')
Label(leftFrame, image=imageEx).grid(row=0, column=0, padx=10, pady=2)
The image should be in the same folder that the Python file is in. Using PhotoImage, the image file should be a GIF or PGM.
Entry
The Entry widget is an input widget. It allows the user to type something that can then be read into the program. To use this widget, the following code is helpful:
userInput = Entry(leftFrame, width = 10) #the width refers to the number of characters
userInput.grid(row=0, column=0, padx=10, pady=2)

#get the text inside of userInput
userInput.get()
It may be necessary to get the inside of the entry when a button is pushed or when the user strikes enter.
Button
A button causes a specified action to occur. To use a button, the following is needed:
newButton = Button(leftFrame, text="Okay", command=btnClicked)
newButton.grid(row=0, column=0, padx=10, pady=2)
The command specified in the button is a function that will be called. The function holds the code that should fire when the button is pushed. This function should be above when the button is made.
Canvas
A canvas allows for various shapes and designs to be drawn onto it. These shapes will remain if more are added unless the shape's pixels are completely overwritten. To add a canvas, the following code is used:
newCanvas = Canvas(leftFrame, width=100, height=100, bg='white')
newCanvas.grid(row=0, column=0, padx=10, pady=2)
This gets the canvas. To draw on the canvas there are a large number of functions available, such as create_arc and create_line.
Text
A Text widget can either be written in or can be written to. To use it, the following is needed:
newText = Text(leftFrame, width=50, height=8, takefocus=0)
newText.grid(row=0, column=0, padx=10, pady=2)

#write to widget
newText.insert(0.0, "Text to insert") #0.0 is beginning of widget
The Text widget is good for creating logs since the data will remain and the user can look back at it.
GUI Example
It is often useful to map out what the GUI is going to look like before starting on it so that all the frames can be nested appropriately. A sketch should be made for the GUI so that it can be visualized, such as the following:
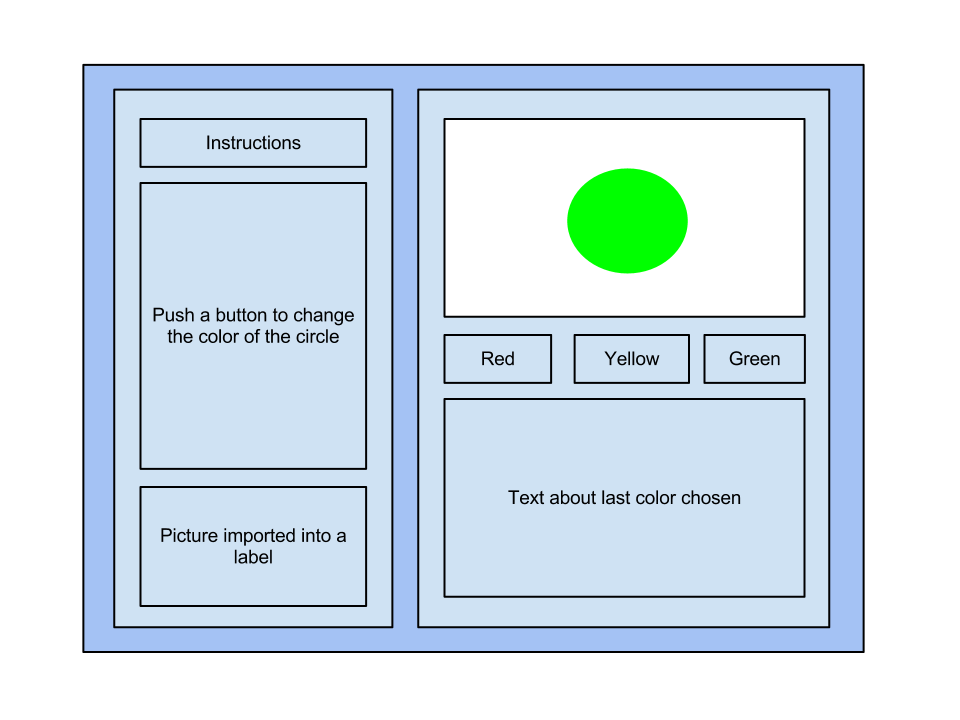
In the above example, only three frames would be necessary: a frame for the left side, a frame for the right side, and a frame surrounding the color buttons. Using this along with the code that was given previously, the following code can be made:
from Tkinter import *

root = Tk() #Makes the window
root.wm_title("Window Title") #Makes the title that will appear in the top left
root.config(background = "#FFFFFF")


def redCircle():
    circleCanvas.create_oval(20, 20, 80, 80, width=0, fill='red')
    colorLog.insert(0.0, "Red\n")

def yelCircle():
    circleCanvas.create_oval(20, 20, 80, 80, width=0, fill='yellow')
    colorLog.insert(0.0, "Yellow\n")

def grnCircle():
    circleCanvas.create_oval(20, 20, 80, 80, width=0, fill='green')
    colorLog.insert(0.0, "Green\n")


#Left Frame and its contents
leftFrame = Frame(root, width=200, height = 600)
leftFrame.grid(row=0, column=0, padx=10, pady=2)

Label(leftFrame, text="Instructions:").grid(row=0, column=0, padx=10, pady=2)

Instruct = Label(leftFrame, text="1\n2\n2\n3\n4\n5\n6\n7\n8\n9\n")
Instruct.grid(row=1, column=0, padx=10, pady=2)

try:
    imageEx = PhotoImage(file = 'image.gif')
    Label(leftFrame, image=imageEx).grid(row=2, column=0, padx=10, pady=2)
except:
    print("Image not found")

#Right Frame and its contents
rightFrame = Frame(root, width=200, height = 600)
rightFrame.grid(row=0, column=1, padx=10, pady=2)

circleCanvas = Canvas(rightFrame, width=100, height=100, bg='white')
circleCanvas.grid(row=0, column=0, padx=10, pady=2)

btnFrame = Frame(rightFrame, width=200, height = 200)
btnFrame.grid(row=1, column=0, padx=10, pady=2)

colorLog = Text(rightFrame, width = 30, height = 10, takefocus=0)
colorLog.grid(row=2, column=0, padx=10, pady=2)

redBtn = Button(btnFrame, text="Red", command=redCircle)
redBtn.grid(row=0, column=0, padx=10, pady=2)

yellowBtn = Button(btnFrame, text="Yellow", command=yelCircle)
yellowBtn.grid(row=0, column=1, padx=10, pady=2)

greenBtn = Button(btnFrame, text="Green", command=grnCircle)
greenBtn.grid(row=0, column=2, padx=10, pady=2)


root.mainloop() #start monitoring and updating the GUI
This code results in the following GUI:

This GUI completes all the functions it is intended to do, but does not do so in a very aesthetic fashion.