Linksprite JPEG Camera
Linksprite JPEG CameraIntroduction
Cameras can be used in numerous applications: survellience, hobbies, robotics, etc. They are very useful to see what is happening when a robot is moving on its own or even to just have fun with.
I got a UART camera to play around with and that I intend to stick on a robot. However, getting the code functioning on the camera was more difficult than I initially expected and there did not appear to be any good tutorials available.
I modified the code provided by Linksprite for their camera so that it will continuously take pictures rather than take one and stop. After all, if this camera is going to be used on a robot, it should be able to take more than one picture.
Adafruit and Sparkfun both provide sample code, but they required having an SD card, which I did not have at the time. This will print the images directly to the serial port and then the images can be translated with the Python code.
Parts
- TTL JPEG Camera from Linksprite
- Arduino
- 2 10K resistors
- Wires
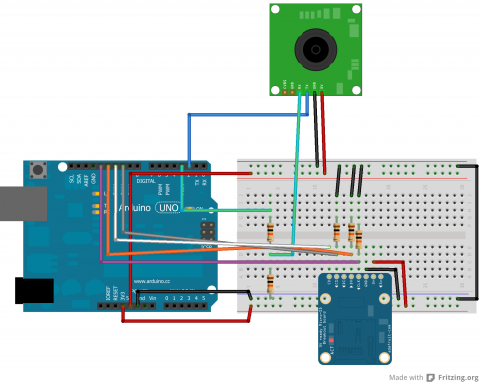
Schematic
Below is the schematic for how to hook up the camera (Adafruit had a tutorial explaining this):

Code
There are two steps in getting a picture from the camera. The first is being able to get the proper HEX to print out on the Arduino serial monitor. The second is being able to turn all that HEX into a JPEG image.
Arduino: Take Pictures
The following code was made by altering the code provided by Linksprite to allow the camera to continuously take images. The original code took one image and stopped.
#include <SoftwareSerial.h>

byte incomingbyte;

//Configure pin 2 and 3 as soft serial port
SoftwareSerial cameraSerial = SoftwareSerial(2, 3);

int a=0x0000,  //Read Starting address
    j=0,
    k=0,
    count=0;
uint8_t MH,ML;
boolean EndFlag=0;


void setup() {
  Serial.begin(19200);
  cameraSerial.begin(38400);

  SendResetCmd();
  delay(3000);
}

void loop() {
  SendTakePhotoCmd();

  Serial.println("Start pic");
  delay(100);

  while(cameraSerial.available()>0) {
    incomingbyte=cameraSerial.read();
  }
  byte b[32];

  while(!EndFlag) {
    j=0;
    k=0;
    count=0;
    SendReadDataCmd();

    delay(75); //try going up
    while(cameraSerial.available()>0) {
      incomingbyte=cameraSerial.read();
      k++;
      if((k>5)&&(j<32)&&(!EndFlag)) {
        b[j]=incomingbyte;
        if((b[j-1]==0xFF)&&(b[j]==0xD9))
        EndFlag=1;
        j++;
        count++;
      }
    }

    for(j=0;j<count;j++) {
      if(b[j]<0x10)
        Serial.print("0");
      Serial.print(b[j], HEX);
    }
    Serial.println();
  }

  delay(3000);
  StopTakePhotoCmd(); //stop this picture so another one can be taken
  EndFlag = 0; //reset flag to allow another picture to be read
  Serial.println("End of pic");
  Serial.println();
}

//Send Reset command
void SendResetCmd() {
  cameraSerial.write((byte)0x56);
  cameraSerial.write((byte)0x00);
  cameraSerial.write((byte)0x26);
  cameraSerial.write((byte)0x00);
}

//Send take picture command
void SendTakePhotoCmd() {
  cameraSerial.write((byte)0x56);
  cameraSerial.write((byte)0x00);
  cameraSerial.write((byte)0x36);
  cameraSerial.write((byte)0x01);
  cameraSerial.write((byte)0x00);

  a = 0x0000; //reset so that another picture can taken
}

void FrameSize() {
  cameraSerial.write((byte)0x56);
  cameraSerial.write((byte)0x00);
  cameraSerial.write((byte)0x34);
  cameraSerial.write((byte)0x01);
  cameraSerial.write((byte)0x00);
}

//Read data
void SendReadDataCmd() {
  MH=a/0x100;
  ML=a%0x100;

  cameraSerial.write((byte)0x56);
  cameraSerial.write((byte)0x00);
  cameraSerial.write((byte)0x32);
  cameraSerial.write((byte)0x0c);
  cameraSerial.write((byte)0x00);
  cameraSerial.write((byte)0x0a);
  cameraSerial.write((byte)0x00);
  cameraSerial.write((byte)0x00);
  cameraSerial.write((byte)MH);
  cameraSerial.write((byte)ML);
  cameraSerial.write((byte)0x00);
  cameraSerial.write((byte)0x00);
  cameraSerial.write((byte)0x00);
  cameraSerial.write((byte)0x20);
  cameraSerial.write((byte)0x00);
  cameraSerial.write((byte)0x0a);

  a+=0x20;
}

void StopTakePhotoCmd() {
  cameraSerial.write((byte)0x56);
  cameraSerial.write((byte)0x00);
  cameraSerial.write((byte)0x36);
  cameraSerial.write((byte)0x01);
  cameraSerial.write((byte)0x03);
}
Arduino: Change Image Size
Here is code that I use when I want to alter the size of the images being taken.
/***********************
ChangeCameraSize
Jennifer Case
2/28/2013
***********************/

#include <SoftwareSerial.h>

SoftwareSerial mySerial = SoftwareSerial(2, 3);

void setup()
{
  Serial.begin(19200);
  mySerial.begin(38400);

}

int sizeChange = 0;

void loop() {
  SendResetCmd();
  delay(3000);

  if (sizeChange==0) {
    ChangeSizeSmall();
    Serial.println("Size Changed");
    sizeChange++;
  }

}

//Send Reset command
void SendResetCmd() {
  mySerial.write((byte)0x56);
  mySerial.write((byte)0x00);
  mySerial.write((byte)0x26);
  mySerial.write((byte)0x00);
}

void ChangeSizeSmall() {
    mySerial.write((byte)0x56);
    mySerial.write((byte)0x00);
    mySerial.write((byte)0x31);
    mySerial.write((byte)0x05);
    mySerial.write((byte)0x04);
    mySerial.write((byte)0x01);
    mySerial.write((byte)0x00);
    mySerial.write((byte)0x19);
    mySerial.write((byte)0x22);
}

void ChangeSizeMedium()
{
    mySerial.write((byte)0x56);
    mySerial.write((byte)0x00);
    mySerial.write((byte)0x31);
    mySerial.write((byte)0x05);
    mySerial.write((byte)0x04);
    mySerial.write((byte)0x01);
    mySerial.write((byte)0x00);
    mySerial.write((byte)0x19);
    mySerial.write((byte)0x11);
}

void ChangeSizeBig()
{
    mySerial.write((byte)0x56);
    mySerial.write((byte)0x00);
    mySerial.write((byte)0x31);
    mySerial.write((byte)0x05);
    mySerial.write((byte)0x04);
    mySerial.write((byte)0x01);
    mySerial.write((byte)0x00);
    mySerial.write((byte)0x19);
    mySerial.write((byte)0x00);
}
I just alter which function I want to call to change the size.
Python
The following code takes a text file named "outputData.txt" and turns it into an JPEG image called "binaryData.jpg". The Python code should be in the same folder that the images are in or it will not be able to find it.
The following is code for Python 2.7:
import binascii

f = open ("outputData5.txt","r")
nf = open("binaryData5.jpg","wb")

#Read whole file into data
while 1:
    c = f.readline()
    d = c.strip()
    if not c:
        break
    nf.write(binascii.a2b_hex(d))


# Close the file
f.close()
nf.close()
The following is code for Python 3:
import binascii

f = open ("outputData14.txt","r")
nf = open("binaryData14.jpg","wb")

#Read whole file into data
while 1:
    c = f.readline()
    d = c.strip()
    if not c:
        break
    nf.write(binascii.a2b_hex(bytes(d, "ascii")))


# Close the file
f.close()
nf.close()
Troubleshooting
There are many errors that can occur when dealing with the camera. I've listed the ones that seem to be common problems and that I've run into.
Banding or Artifacting
I found that banding or artifacting occurred when I tried to take larger images. There is a delay right after the SendReadDataCmd() line that can be increased to reduce banding, but I was never successfully able to take the large images without either banding or losing the last part of the image.
Python JPEG did not work
If the JPEG made from the text file did not open or was corrupted, it is probably due to the fact that the text file did not have the complete image. This could be due to the first line missing from image sent through the serial.
This has been fixed by adding a small delay after the command for the taking the photo has been sent.
Edits
12/19/2013:
Edits have been made to the code so that more than one picture will be read. - Thanks jadnexus for pointing it out
Also if you are looking to save these pictures onto an SD card, take a look at this following tutorial: http://robotic-controls.com/learn/projects/simple-security-system or http://robotic-controls.com/learn/sensors/linksprite-jpeg-camera/saving-images-sd-card-0
Saving Images on an SD Card
Saving Images on an SD CardIntroduction
Before trying this code, make sure you have ensured that your camera works because you will not be able to see what is happening with the camera while it is saving to the SD card. If you are having issues with this, please check out the Evaluation Software provided by Linksprite.
You should also take a look at this tutorial and ensure that you can in fact get a converted images before trying to save several images.
Parts
- TTL Camera by Linksprite
- SD Card Breakout Board
- SD Card
- 2 10k Resistors
- 3 other Resistors (I'm not sure if size matters, but mine were all above 1k)
- Wires
- Arduino
Schematic
Code
Arduino
This code sets up the SD card and takes pictures, incrementing the name the file is saved as each time.
/***************************
Save Images on SD Card

by Jennifer Case
4/14/2014

Parts:
-SD Card Breakout Board
-TTL Camera

Pin 2,3 - Camera
Pin 10 - CS/D3
Pin 11 - CMD
Pin 12 - D0
Pin 13 - CLK
****************************/
#include <SoftwareSerial.h>
#include <SdFat.h>

//SD Card
SdFat sd;
SdFile myFile;
int picCnt = 0;

//Camera
byte incomingbyte;
SoftwareSerial cameraSerial = SoftwareSerial(2, 3);   //Configure pin 2 and 3 as soft serial port
int a=0x0000,j=0,k=0,count=0;   //Read Starting address
uint8_t MH,ML;
boolean EndFlag=0;

//Declare pins
const int chipSelect = 10;

void setup() {
  Serial.begin(19200); //start serial
  cameraSerial.begin(38400); //start serial with camera

  // Initialize SdFat or print a detailed error message and halt
  // Use half speed like the native library.
  // change to SPI_FULL_SPEED for more performance.
  if (!sd.begin(chipSelect, SPI_HALF_SPEED)) sd.initErrorHalt();

  SendResetCmd(); //allows camera to take pictures
  delay(3000); //delay necessary for camera reset
}

void loop() {
    //create title for images
    char photoTitle[25] = {};
    sprintf(photoTitle, "pic%d.txt", picCnt);

    //make sure file can be created, otherwise print error
    if (!myFile.open(photoTitle, O_RDWR | O_CREAT | O_AT_END)) {
      sd.errorHalt("opening photoTitle.txt for write failed");
    }

    SendTakePhotoCmd(); //take photo
    delay(200); //delay to make sure there is no drop in the data

    while(cameraSerial.available()>0) {
      incomingbyte=cameraSerial.read(); //clear unneccessary serial from camera
    }
    byte b[32];

    while(!EndFlag) {
      j=0;
      k=0;
      count=0;
      SendReadDataCmd(); //command to get picture from camera

      delay(75); //delay necessary for data not to be lost
      while(cameraSerial.available()>0) {
        incomingbyte=cameraSerial.read(); //read serial from camera
        k++;
        if((k>5)&&(j<32)&&(!EndFlag)) {
          b[j]=incomingbyte;
          if((b[j-1]==0xFF)&&(b[j]==0xD9))
          EndFlag=1; //when end of picture appears, stop reading data
          j++;
          count++;
        }
      }

      for(j=0;j<count;j++) { //store picture into file
        if(b[j]<0x10)
          myFile.print("0");
        myFile.print(b[j], HEX);
      }
      myFile.println();
    }

    StopTakePhotoCmd(); //stop this picture so another one can be taken
    EndFlag = 0; // reset flag to allow another picture to be read

    myFile.close(); //close file

    picCnt++; //increment value for next picture
}

//Send Reset command
void SendResetCmd() {
  cameraSerial.write((byte)0x56);
  cameraSerial.write((byte)0x00);
  cameraSerial.write((byte)0x26);
  cameraSerial.write((byte)0x00);
}

//Send take picture command
void SendTakePhotoCmd() {
  cameraSerial.write((byte)0x56);
  cameraSerial.write((byte)0x00);
  cameraSerial.write((byte)0x36);
  cameraSerial.write((byte)0x01);
  cameraSerial.write((byte)0x00);

  a = 0x0000; //reset so that another picture can taken
}

void FrameSize() {
  cameraSerial.write((byte)0x56);
  cameraSerial.write((byte)0x00);
  cameraSerial.write((byte)0x34);
  cameraSerial.write((byte)0x01);
  cameraSerial.write((byte)0x00);
}

//Read data
void SendReadDataCmd() {
  MH=a/0x100;
  ML=a%0x100;

  cameraSerial.write((byte)0x56);
  cameraSerial.write((byte)0x00);
  cameraSerial.write((byte)0x32);
  cameraSerial.write((byte)0x0c);
  cameraSerial.write((byte)0x00);
  cameraSerial.write((byte)0x0a);
  cameraSerial.write((byte)0x00);
  cameraSerial.write((byte)0x00);
  cameraSerial.write((byte)MH);
  cameraSerial.write((byte)ML);
  cameraSerial.write((byte)0x00);
  cameraSerial.write((byte)0x00);
  cameraSerial.write((byte)0x00);
  cameraSerial.write((byte)0x20);
  cameraSerial.write((byte)0x00);
  cameraSerial.write((byte)0x0a);

  a+=0x20;
}

void StopTakePhotoCmd() {
  cameraSerial.write((byte)0x56);
  cameraSerial.write((byte)0x00);
  cameraSerial.write((byte)0x36);
  cameraSerial.write((byte)0x01);
  cameraSerial.write((byte)0x03);
}
Python
The Python code from the camera tutorial has been revamped to allow for multiple photos to be processed at a time. This is set up to work with the naming given in the above code. The user may still have to adjust the range depending on the number of photos.
#!/usr/bin/python
# open file
import binascii

count = 0

for count in range (0,4):

    f = open ("PIC%d.txt" % (count),"r")
    nf = open("IMAGE%d.jpg" % (count),"wb")

    #Read whole file into data
    while 1:
        c = f.readline()
        d = c.strip()
        #print (c)
        #print (d)
        if not c:
            break
        nf.write(binascii.a2b_hex(bytes(d, "ascii")))


    # Close the file
    f.close()
    nf.close()