Arduino to Arduino Serial Communication
Arduino to Arduino Serial CommunicationIntroduction
It is possible to chain Arduinos together in such a way as to get communication between the two. Having Arduino-Arduino communication can be useful for many projects, such as having one Arduino to run motors and having another sense the surroundings and then relay commands to the other Arduino. This can be done in several methods, using I2C and Serial, to list a few.
This tutorial will focus on Arduino-Arduino communication through the serial ports (RX and TX).
Schematic
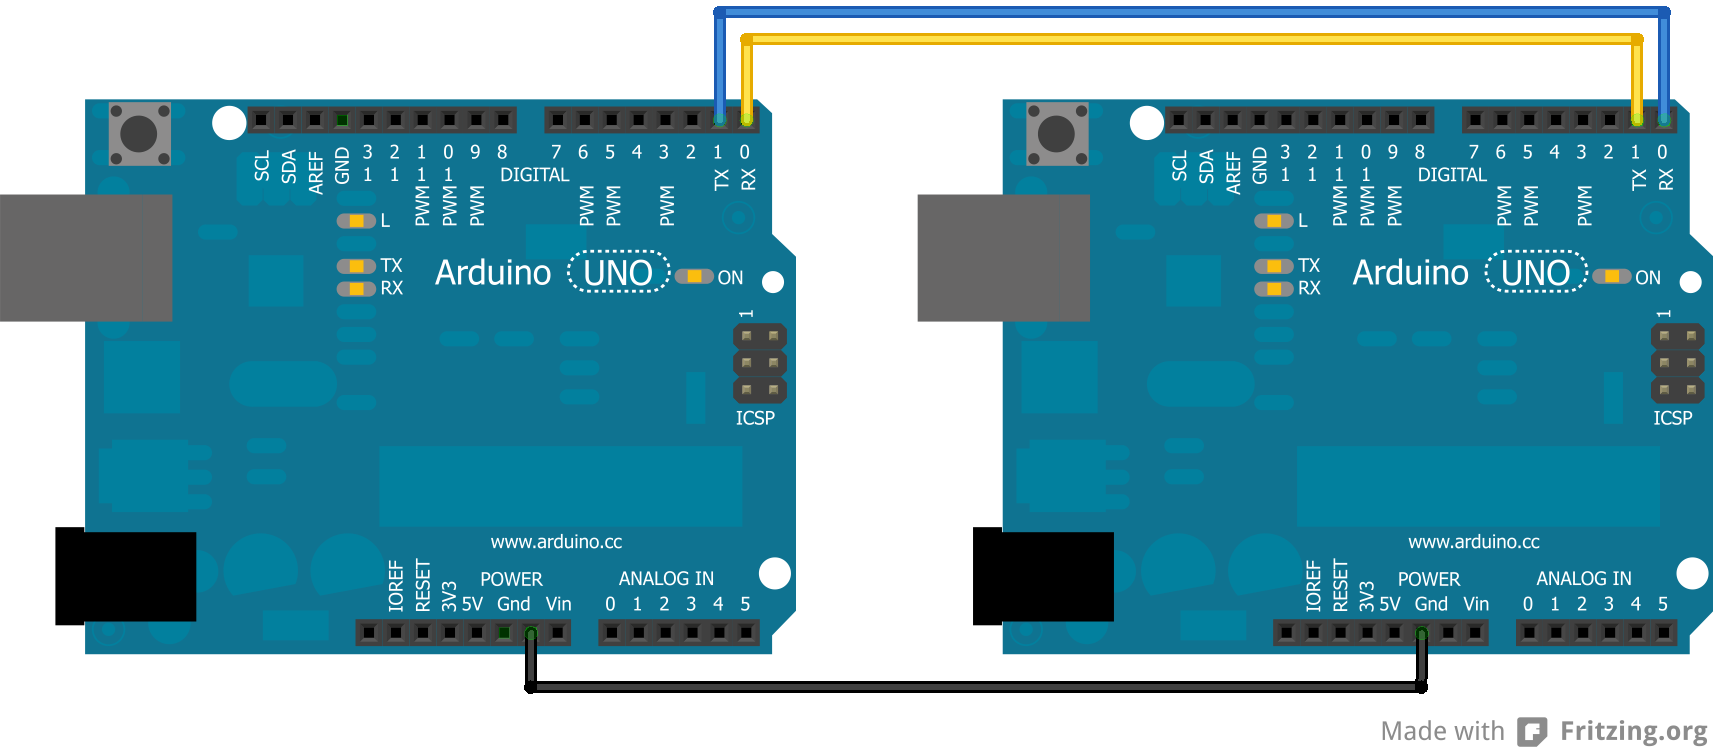
The schematic below shows how to connect the two Arduinos together. This shows two Unos, but if a Mega is used, it can be connected to any of the Serial ports on the Mega as long as that is accounted for in the code.
There has to be a common ground between the two or else it will not function properly. Also, note that TX goes to RX and RX goes to TX.
Coding
When sending things through serial, everything is sent in bytes. These bytes are then read one byte at a time by the other Arduino. When it is just characters being sent through the serial, it is relatively easy to convert from characters to bytes. However, if there are both characters and numbers are going through, this can lead to messing up the data because a number and a character can have the same byte value, but that does not make them the same. Numbers are also tricky because they may not actually fit in the byte.
Simple Code
The easiest way to get around this is to try to avoid using characters and numbers at the same time. This can be done by sending one character across, each with a different meaning. A good example of this comes from the Arduino Physical Pixel tutorial.
Upload the Physical Pixel code, which can be found in the Arduino IDE under: File >> Examples >> Communication, onto one Arduino.
On the other Arduino, upload:
void setup() {
  Serial.begin(9600);
}

void loop() {
  Serial.print('H');
  delay(1000);
  Serial.print('L');
  delay(1000);
}
When this is run, the LED attached to Pin 13 on the Arduino with the Physical Pixel code should flash on and off at a frequency of 0.5 Hz. To make sure this is actually the code doing that, the delays can always be changed in the above code.
In this code the job of 'H' was to turn an LED on and the job of 'L' was to turn the LED off. This can easily be applicable to getting various characters triggering more reactions.
However, depending on the application, this may not be enough and more drastic code may be required.
Complex Code
For sending data from one Arduino to another in a form that cannot be simplified, there are other options. One option is to turn everything sent from the Sender Arduino into characters and then have the Receiver Arduino read in the characters. The data is actually sent as bytes, but the Arduino can convert from characters to bytes and vice versa.
Sender Code
The sender code changes characters into bytes and, if necessary, it changes number values into characters before turning it into bytes. Below is a sample of the Sender code:
//Sender Code

char str[4];

void setup() {
  Serial.begin(9600);
}

void loop() {
  int value=1234; //this would be much more exciting if it was a sensor value

  itoa(value, str, 10); //Turn value into a character array
  Serial.write(str, 4);
}
Receiver Code
The receiver will then receive the byte array from the other Arduino and interpret it there. Below is the code for the receiver. Note that this code is intended for a Mega since it will interpret the data received from the other Arduino and then print to the Serial Monitor what it received so that the user can check it. This debugging can be avoided by using an Uno and then printing what was found onto an LCD screen that uses I2C communication.
//Receiver Code

char str[4];

void setup() {
  Serial.begin(9600);
  Serial1.begin(9600);
}

void loop() {
  int i=0;

  if (Serial1.available()) {
    delay(100); //allows all serial sent to be received together
    while(Serial1.available() && i<4) {
      str[i++] = Serial1.read();
    }
    str[i++]='\0';
  }

  if(i>0) {
    Serial.println(str,4);
  }
}
There is one flaw with this program as it is now. It results in only a character array, so if the integers were desired, they are lost without further work on the data.
Further tutorials have been made to show how this data may be manipulated by splitting strings or getting floats from the character arrays.
