Making the GUI Attractive
Making the GUI AttractiveIntroduction
It is one thing to make a GUI and another to make a GUI that people will want to use. Despite the fact that the appearance of a GUI does not really affect how the program runs, it is always prudent to set up GUIs in a way that they could be presented professionally.
Although, this is really only important if the GUI runs properly. Making it function accordingly is always more important than its appearance.
Note: This will focus on improving the GUI example from the previous tutorial.
Making Frames the Same Height
When GUIs with multiple frames are built, it can be seen that each frame is its own unique size based on what is in each frame. Usually, this is a nuisance. Fortunately, there is an easy fix: Sticky.
This gets added when you put it in the grid:
leftFrame.grid(row=0, column=0, padx=10, pady=2, sticky=N+S)
The options for Sticky are: N, E, S, W.
Justification of Text in Labels
If there is only one line of text in the label, the text can be justified by using Anchor. However, sometimes it is necessary to have more than one line of text, such as the instructions label. In this case, it is necessary to use Wraplength to get the text wrapped. Unfortunately, this wants the wrap length in pixels rather than characters, so that can be a bit of a guessing game to get it right. If there is more than one line of text, it should also include Justify.
The code below shows an example of justification of multiple text to the left:
Instruct = Label(leftFrame, width=22, height=15, text=instructions, takefocus=0, wraplength=170, anchor=W, justify=LEFT)
The options for Anchor are: N, NE, E, SE, S, SW, W, NW, CENTER.
The options for Justification are: LEFT, RIGHT, CENTER.
Fonts
The main thing with fonts, is not to pick really obnoxious fonts that people are not going to want to look at. Simple fonts are better for the main GUI and if a stylized font is desired for only select portions, that is fine as long as the stylized font is not too crazy.
Fonts are added by using the following code:
Instruct = Label(leftframe, width=30, height=9, text=instructions, takefocus=0, wraplength=275, font=("MS Serif", 12), anchor=W, justify=LEFT, background=framebg)Background Colors
The initial background Python uses is white, which is a bit boring. To chose unique colors, it may be necessary to look up their RGB color codes. However, caution should be given when choosing colors. They should not be obnoxiously bright so that they attract away from the attention of the GUI itself. The colors should be neutral and minimally invasive.
This doesn't mean to only use beige or boring colors, but to choose gentler colors that people will not mind staring at.
The font color is added when the declaration was made, or can change later if needed:
leftFrame = Frame(root, width=200, height = 600, bg="#C8F9C4")
However, changing a frame does not change the color of the labels, so the background specification can be added to all of those as well.
Borders
Adding borders can be a nice touch to the various components in the GUI. To do this, the code should refer to the hightlight thickness, which determines the width of the border in pixels, and the highlight background, which refers to the backgrounds color.
An example of this is below:
leftFrame = Frame(root, width=200, height = 600, bg="#C8F9C4", highlightthickness=2, highlightbackground="#111")
Visual Arrangement
The arrangement of the GUI should be uncluttered and easy to read. Like options should be catergorized together, but seperated from other components. A lot of this is a matter of taste on who the end user is, so keep that in mind when designing GUIs.
GUI Example
Looking at the same GUI from the previous tutorial, here is the code to clean it up:
from Tkinter import *
root = Tk() #Makes the window
root.wm_title("Window Title") #Makes the title that will appear in the top left
root.config(bg = "#828481")
def redCircle():
circleCanvas.create_oval(20, 20, 80, 80, width=0, fill='red')
colorLog.insert(0.0, "Red\n")
def yelCircle():
circleCanvas.create_oval(20, 20, 80, 80, width=0, fill='yellow')
colorLog.insert(0.0, "Yellow\n")
def grnCircle():
circleCanvas.create_oval(20, 20, 80, 80, width=0, fill='green')
colorLog.insert(0.0, "Green\n")
#Left Frame and its contents
leftFrame = Frame(root, width=200, height = 600, bg="#C8F9C4", highlightthickness=2, highlightbackground="#111")
leftFrame.grid(row=0, column=0, padx=10, pady=2, sticky=N+S)
Inst = Label(leftFrame, text="Instructions:", anchor=W, bg="#C8F9C4")
Inst.grid(row=0, column=0, padx=10, pady=2, sticky=W)
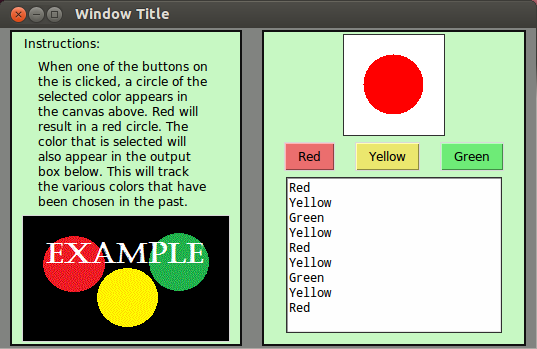
instructions = "When one of the buttons on the is clicked, a circle\
of the selected color appears in the canvas above. Red will result in a red circle. The color that is\
selected will also appear in the output box below. This will track the various colors that\
have been chosen in the past."
Instruct = Label(leftFrame, width=22, height=10, text=instructions, takefocus=0, wraplength=170, anchor=W, justify=LEFT, bg="#C8F9C4")
Instruct.grid(row=1, column=0, padx=10, pady=2)
imageEx = PhotoImage(file = 'image.gif')
Label(leftFrame, image=imageEx).grid(row=2, column=0, padx=10, pady=2)
#Right Frame and its contents
rightFrame = Frame(root, width=200, height = 600, bg="#C8F9C4", highlightthickness=2, highlightbackground="#111")
rightFrame.grid(row=0, column=1, padx=10, pady=2, sticky=N+S)
circleCanvas = Canvas(rightFrame, width=100, height=100, bg='white', highlightthickness=1, highlightbackground="#333")
circleCanvas.grid(row=0, column=0, padx=10, pady=2)
btnFrame = Frame(rightFrame, width=200, height = 200, bg="#C8F9C4")
btnFrame.grid(row=1, column=0, padx=10, pady=2)
colorLog = Text(rightFrame, width = 30, height = 10, takefocus=0, highlightthickness=1, highlightbackground="#333")
colorLog.grid(row=2, column=0, padx=10, pady=2)
redBtn = Button(btnFrame, text="Red", command=redCircle, bg="#EC6E6E")
redBtn.grid(row=0, column=0, padx=10, pady=2)
yellowBtn = Button(btnFrame, text="Yellow", command=yelCircle, bg="#ECE86E")
yellowBtn.grid(row=0, column=1, padx=10, pady=2)
greenBtn = Button(btnFrame, text="Green", command=grnCircle, bg="#6EEC77")
greenBtn.grid(row=0, column=2, padx=10, pady=2)
mainloop()Here is the result: