Programming
ProgrammingPreface
It turns out, making robots requires a lot of programming. The more autonomous, the more advanced the program.
Here are some conceptual lessons in programming. Odds are you'll find them useful when programming for a robot.
Introduction to C++ Programming
Introduction to C++ ProgrammingIntroduction
Programming is becoming more useful in a variety of fields. There are a lot of uses, but we are most interested in robotics applications. Microcontrollers like the Arduino are programmed in C++, which is undoubtedly the most widespread language. It is powerful, fast, and easier to use than some earlier languages. However, it is not the easiest language to learn. It has a very strict syntax and the errors can be hard to understand. It is still worthwhile to learn due to its usefullness.
If you are just interested in learning programming in general, I highly recommend looking at Codecademy, which is an excellent interactive environment for learning for the first time. Of their courses, Javascript is most similar to C++, but Python is the easiest and most powerful choice.
The Basics
Programming is actually quite simple. There are really only a few things that you need to know to get started.
- Data is stored in "variables"
- The right hand side of an equals sign goes into the storage with the name at the left
- There are different kinds of variables that contain different kinds of information
- A program is executed top down
- Each line is terminated by a semi colon
- Comments are ignored ( lines that begin with two slashes: // )
- There are three fundamental actions that alter the top-down flow:
- Conditions: do something only if something else is true
- Loops: do something repeatedly
- Functions: do a group of things and get a result
Try It Yourself
Set up a Development Environment
You need a place to code! Code::Blocks is a good place to start, but there are dozens of options. Microsoft Visual Studio Express is actually free to use, but there are free-er (open source) options too.
To install Code::Blocks, go here and choose the mingw-setup.exe. The mingw is important because it includes a compiler, which turns the program that you can write and read into something that your computer can actually run. Install the program like you would any other.
Use the Development Environment
Now get started! Run Code::Blocks. Make a new source file (File > New > Empty file). Put this simple program in there.
#include <iostream>
using namespace std;

int main() {
    // anything preceeded by a // is a comment and ignored by the computer
    // code goes in between the above and below { and }

    cout << "HELLO WORLD!"; //shows "HELLO WORLD!" in a command prompt
}
Be sure to pay attention to things like semi colons and brackets. It won't work if you miss one.
All this program does is print out the words HELLO WORLD to the terminal or command prompt whenever it is run.
Try it out! Hit the green button "Run" triangle at the top of the Code::Blocks to compile and run it.
Fundamentals of Programming
These are the five things that you need to know to program, that's all!
- Variables are places you store data
- Operators do things to data
- Conditions check data, and do something if it is a certain way
- Loops let you repeat actions
- Functions let you group actions together so you can re-use them and return a result of those actions
Variables
Variables are not at all like the variables you find in math. These are just named places you put information. You can change the contents of what's at a name, which is what "varies" about it. You can only store a few kinds of information, and they are:
int: An integer can hold a whole numberchar:A character can hold a letter or symbolfloat: A floating decimal point can (inaccurately) hold really large and really small numbers (and decimals)
First, you need to declare the variable. You start by saying the type of data it can contain. When this is done in C++, it is uninitialized - meaning that you have no idea what it contains. You might want to assume, for example, that a number starts at 0 when you declare that you want to use it, but you have to explicitly say that.
Then, you assign contents to the variable. The contents can be pre-defined by you, or you can get the contents of another variable, or even read it in from somewhere else.
Arrays
All variables can be be arrays. An array is a series of variables put next to each other. You specify the array with the array's name, and which item in the list of its variables you want with a number in brackets after it. The first item in the list is at the number 0. You have to say how large an array is when you declare it.
An array with its index behaves exactly the same as a variable would
int numbers[3];     // declare the array (list) of integers (whole numbers)
numbers[0] = 100;   // fill the first item in the list with a 100
numbers[1] = 200;
numbers[2] = 300;   // fill the last item in the list with a 300
Swap Example
Swapping variables is an excercise of the very important concept of storage and variables.
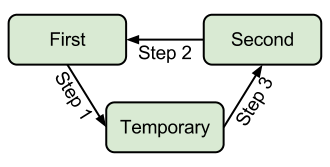
Imagine you have two cars in a parking lot you want to swap parking spaces with. You're the only valet and you want to swap the two cars so they match colors with the other cars because you're bored. In order to swap the cars, you'll have to move one car to a third parking space temporarliy while you move the other into the newly vacated space. It's a similar solution to a slightly different dilema. If you were to try to swap directly (without a temporary) with the cars, you would smash one into the other, but in a program you would end up two copies of the same data.
Start by declaring two variables you want to swap, and a temporary variable. Then assign something different to the two variables. Store the contents of one of those into the temporary. This is extremely important because otherwise the contents of "first" will be lost in the next step, which moves the contents of "second" into the "first" variable. Finally, the temporary variable moves the former contents of "first" into the "second" variable.
| Swap Integers | Swap Floats | Swap Characters | Swap Array Elements |
|---|---|---|---|
//declare integers int first = 100; int second = 200; int temp; //next shift data // Step 1 temp = first; // Step 2 first = second; // Step 3 second = temp; |
//declare floats float first = 1.0; float second = 2.0; float temp; //next shift data // Step 1 temp = first; // Step 2 first = second; // Step 3 second = temp; |
//declare chars |
int num[2]; |
As you can see, it is the same proceedure to swap the contents of variables, regardless of data type.
Operators
An operator is a letter or couple of letters that just say "do something" to a variable. For example, a + sign is an operator that says add two numbers. There are actually not that many operators. Operators do very simple actions. More advanced actions can usually be broken down into a series of these simple actions. Don't worry, you don't have to remember it all at once, but they are fairly intuitive.
- Storage
=The assignment operator copies the contents at the right into the variable at the left.- Math - modify the data
+, -, *, /all perform math operations the way you would expect++and--increment or decrement a variable by 1- Really,
number++is just a shorthand fornumber = number + 1 +=and-=are shorthand for addition and subtraction then asigment- Again,
number += 10is just a shorthand fornumber = number + 10 - Logical - Checks something about the data
==The equivelence operator checks to see whether the contents of the right and left are the same- Be careful not to confuse it with the assignment operator
= >,<,>=,<=all check for inequalities- ! also called "not" inverts the condition, making a false into true, and a true into false
&&,||also called "and" and "or" respectively are ways to check multiple conditions at once
Operator Usage Example
// declaration
int number = 1;      // create space for and store a whole number: 1

// arithmetic
cout << number;      // prints 1
cout << number + 2;  // prints 3 (1 + 2 = 3)
cout << number;      // prints 1. "number" did not change! Nothing was assigned;

// assignment
number = number + 2; // add 1 to 2, then assign that result into number
cout << number;      // prints 3. "number" changed! It was assigned a new value

// increment
number++;            // adds 1 to the former contents of number (3)
cout << number;      // prints 4 (3 + 1 = 4)

// logical operations
cout << number == 4; // prints a 1, which means true. "number" does equal 4.
cout << number > 4;  // prints a 0, which means false. Number is not greater than 4
Conditions
Conditions, as the name suggests, will check to see if something is true, then react based on that information. Conditions are used in if statements, and evaluated in loops (more on that later). They are either true or false.
Use the logical operators to construct your conditions. You can check for equalities, inequalities, and chain these conditions together with and (&&) and or (||) operators.
An if will only execute the code within its {brackets} if th condition is true. An else if's code will only get executed if the preceeding "if" was false and it's condition is true. An else's cod will only be executed if the preceeding if and else ifs are all false.
Guessing Game Example
// Ask for a letter from the user.
cout << "I want to play a game. I am thinking of a letter a through z. Guess: ";

char letterRead;   // declare space for an character
cin >> letterRead; // read input for the command prompt and store it in letterRead

// use a condition to see if their guess was correct
// note the use of the equivelence checking operator (==), not assignment (=)
if ( letterRead == 'm') { // m was the correct letter
   cout << "Correct! You win!";
}

// if the character is after 'z' or it is before 'a'
// then the character was not a lower case letter a through z
else if ( letterRead > 'z' || letterRead < 'a') {
   cout << "That was not a letter...";
}

// the character was a letter, but it was not the correct letter
else {
   cout << "Wrong. You lose.";
}
Loops
Loops run code on repeat until a condition says "stop".
char continue = 'y';
// the first time, the loop will run since it starts with 'y'
while ( continue == 'y' ) {
    //do something here until the user says 'n'

    cout << "Continue? (y/n)";
    cin >> continue;
}
Most loops simply count a number by one so you can go through all the possibilities in a range because loops are most useful for doing something to all of the elements in an array. As a result, a shorthand has been made. Compare:
| While Loop | For Loop |
|---|---|
int numbers[10]; |
int numbers[10]; |
Both loops essentially do the same thing. They print the random, uninitialized contents of the "numbers" array with a newline ('\n') at the end of each element.
Functions
Functions group operations into a name. You run the operations by saying the name of the function followed by (). You can give the function parameters by passing them between the parenthesis. Maybe most importantly, a function returns the results of its group of actions once it is done.
Note tha main is a function. It is run by default when you run the program. It also is an int. The value returned by main is actually an error code.
int myPow(int base, int exponent) {

   // powers of 1 and negative powers will return 0, regardless of the base
   if ( exponent <= 0 ) {
       return 1;
   }

   int result = base; // create a place to store the result

   //multiply the result by itself "exponent" number of times
   for( int i = 1; i < exponent; i++) {
      result *= base;
   }

   return result; //return the product of the exponent
}

int main() {
   cout << myPow(5,0); // prints 5^0, which is 1
   cout << myPow(1,5); // prints 1^5, which is 1
   cout << myPow(2,4); // prints 2^4, which is 16
   cout << myPow(2,5); // prints 2^5, which is 32
   cout << myPow(3,3); // prints 3^3, which is 27

   return 0; // there was no error
}
Conclusion
Congradulations! If you understood most of this, you are now qualified to do quite a few awesome things with an Arduino. Check out our tutorials for tricks with Arduino and using sensors with an Arduino.
There is still more to know, but it gets easier from here. In larger programs you will need to worry about where a variable can be accessed from. Also, classes and structures help you organize your data and are extremely powerful when you know how to use them.
Data Storage
Data StorageAnalogy
Storing data on a computer is a lot like storing things in a warehouse. If you keep track of where you put things well enough, it shouldn't matter how much stuff you have stored.
Imagine an empty warehouse. If you store something in it, it doesn't really matter if you keep track of it because it's easy to look for it again. If the warehouse were full, you better keep track of where you put your stuff or you'll have to look everywhere for it. In a warehouse, you would probably write down an isle number, a shelf number, and maybe a pallet number. This way, you don't look through all the things, just go directly to the right place.
Warehousing Techniques
Unindexed Storage (left), Indexed Storage (right)
So, by keeping records of stuff as it comes in, you reduce the time it takes to look for it later. It is like what keeps your computer from getting slower when you add files to it. Your file system is the guy in the warehouse putting your files somewhere, and keeping track of where it should be so you can find it again quickly. This is how Google can search the entire internet in just milliseconds - by using a process called indexing. More data doesn't have to be slower. This is why it is important to understand how to store your data efficiently.
Linked Lists
A lot of the time, you have a specific order to things, but might want to be able to add or remove stuff at the beginning or in the middle. With an array, you would have shift the contents around to keep it in the right order. With a linked list, you just change a few pointers to change the order.
There are two main kinds of linked lists: queues and stacks. It's actually pretty easy to remember which is which. A queue is like the line at the grocery store (which in Britain, is actually called a queue), and a stack is like a stack of trays.
A queue is First In First Out (FIFO). Things are handled in the order they are receieved. This is extremely useful for things like buffers.
A stack is Last in First Out (LIFO). It's mostly useful for coming back to things if you get interrupted or retracing your steps.
The two are extremely similar in concept and implementation, but a queue is more common and more useful. A lot of programming languages and environments have pre-built versions of both these which are nice and reliable. Some examples of queue libraries: Python, C++ STL, and Arduino C. These queues are great because they dynamically expand at runtime, so they use only as much space as they need.
Using a Queue
Push: New things can be added to the end of the queue with a
queueName.push( newThing )
Pop: Once there are things waiting in the queue, you get the next one in line out by saying:
value = queueName.pop()
This both stores the value of the next one in line to the variable at the left, and removes it from the list, so be careful not to accidentally remove something before you're really done with it.
Peek: If you don't want to delete the next thing waiting, but still want to see what it is, you can take a peek at it with
value = queueName.peek()
Indexing
An index is like the index at the front or back of a book. You have a condensed table of things you might look for and a place to jump to. Indexes are great for speedy searches through data. The problem is that they require the data to be unique - otherwise you wouldn't know which place to jump to. You could try having a list of places to jump to, but at that point it gets complicated and you lose a lot fo the speed benefit that makes indexing so great. If you find yourself considering indexing to effectively organize your data, you might want to consider using a database instead.
If you want to keep it light or do it yourself, you may need to implement a hash table. A hash table is a way to look things up in constant time - which means it takes the same amount of time to find something no matter where it is.
Databases
In general, you will probably not be using a database on a robotic system. Many of the existing database applications would simply not work on an arduino. You could, however, put one on a raspberry pi.
It might be easiest to think of a database like a spreadsheet. Each column stores a specific kind of information. Unlike a spreadsheet, each row usually has a unique identifier, which can be used as the index. An index can be quickly found in the table. These are particularly useful for "merging" tables (the operation is called JOIN).
Databases are powerful tools for filtering complex data, and continue to be efficient on larger scales.
An example of potential use in a robot is that you could receive sensor readings with a raspberry pi, and store them in a database for analysis. Unless they data needs to be accessed during operation, it might just be easier to store the data to a file in a Comma Seperated Value sheet (CSV), which could then be opened in a spreadsheet program.
LaTeX
LaTeXIntroduction
LaTeX is a typesetting system. It's an easy way to make very professional looking papers. In fact, many academic books were written in LaTeX. You can usually tell by looking in the first few pages. Somewhere it might say "Typeset in LaTeX".
LaTeX cannot really help you build a robot, but if you are building a robot either professionally or academically, you will need to present your project in a technical and professional manner with a well-polished document.
LaTeX basically takes a plain text file with special syntax and compiles that syntax into a well-formatted PDF.
Installation
From anecdotal experience, the best and most common way to write LaTeX documents is Texmaker. Other LaTeX editors exist, but they all use the same LaTeX engine, so there really is not that big of a difference between them. Some have different ways to preview the document or wizards to make more complex features. Really, all you need is a plaintext editor and a command prompt, but an editor provides a more streamlined experience.
The installation is somewhat large - about a gigabyte. On Windows and Mac it is a multi-step process to install the LaTeX editor and the compiler. On Ubuntu simply run: sudo apt-get install texmaker
Using Texmaker
Really, all you need to do is make a new document, add some bare minimum structure to the document, and hit the F1 key on your keyboard or the "quickbuild" arrow at the top. Most of the other buttons are just there to help you find more features of latex. For example, there is a symbol library in the left panel if you click the buttons on the far left. There is also a tabular wizard that is extremely helpful for making tables.
Demo Tex Document
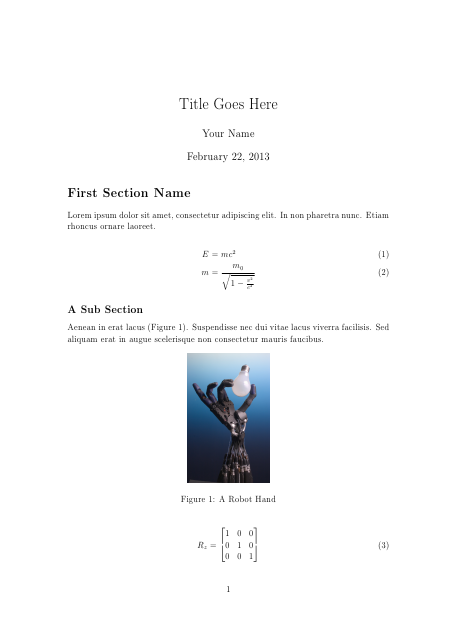
Here is a minimal document that should explain the important features when first learning LaTeX. The various commands will be explained below, but this simply makes a title area, a section, a paragraph, a subsection, a paragraph, and an image. The image to the right is the finished product once it compiles.
As you can see, the default LaTeX article document class has large amounts of whitespace. You can override this, but it looks pretty nice the way it is.
Take note of how nice the equations look, and the minimal amount of work it takes to get them to look that way. The challenge is in learning the syntax, but it is definitely worthwhile since it is so easy and produces such great results.
Another important feature of LaTeX is how it can reference things within the document. For example, by using the section command, you not only style the element on the page, but also make a reference so that a table of contents can easily be made. Also, figures and tables can be easily referenced from within the document by name, number, and page number. A list of figures and tables can also be easily added.
Adding images is probably the hardest part of using LaTeX. It is hard to beat the drag and drop ease of adding an image to a modern word processor. In LaTeX, the image has to be in the same folder as the document. Actually inserting it into the document in a certain place occasionally yields unexpected results.
Code to Generate Demo Document
\documentclass[12pt]{article}                %the standard page format
\usepackage{amsmath}                         %math stuffs
\usepackage{graphicx}                        %embed image
\DeclareGraphicsExtensions{.pdf,.png,.jpg}   %embedabble types

% set page margins
\usepackage[top=1.1in, bottom=1.1in, left=1.27in, right=1.27in]{geometry}

% remove the numbers in front of sections
\setcounter{secnumdepth}{0}

\begin{document}
\title{Title Goes Here}
\date{February 22, 2013}
\author{Your Name\\}
\maketitle

\section{First Section Name}
Lorem ipsum dolor sit amet, consectetur adipiscing elit. In non pharetra nunc.
Etiam rhoncus ornare laoreet.

% a math environment, with the ability to align to &s and equation numbering
\begin{align}
E &= mc^2
\\
m &= \frac{m_0}{\sqrtablest{1-\frac{v^2}{c^2}}}
\end{align}

\subsection{A Sub Section}
Aenean in erat lacus
(Figure \ref{robohand}). Suspendisse nec dui vitae lacus viverra facilisis.
Sed aliquam erat in augue scelerisque non consectetur mauris faucibus.

% add an image inside a figure
\begin{figure}[here]
\centering
\includegraphics[width=1.5in]{robothand.jpg}
\\ \caption{A Robot Hand}
\label{robohand}
\end{figure}

% demo a matrix
\begin{align}
R_z &=
\begin{bmatrix}
1 & 0 & 0 \\
0 & 1 & 0 \\
0 & 0 & 1
\end{bmatrix}
\end{align}

\end{document}
Formatting Commands
Sectioning
Chapters, Sections, and Subsections can be used to give your document hierarchy. This hierarchy can provide visual seperation and be used in a table of contents. Their commands are: \chapter{Chapter Name}, \section{Section Name}, and \subsection{Subsection Name}
Tables
If you are using Texmaker, start by using Wizard > Tabular.
\begin{tabular}{l|cc}
name & attribute & equation \\
\hline
square & a & $x^2$ \\
cube & v & $x^3$ \\
\end{tabular}
The above code will create a 3x3 table. According to the second part of the begin command, there are three columns. The first one will be left aligned, the second two are center aligned, and there will be a border between the first and second column. There will also be a horizontal border between the first and second row due to the hline command. Note that it is possible to use the inline math environment in a table.
Figures
Figures typically contain images, as shown in the demo above. They can also be labelled and referenced in the body of a paragraph.
Figure placement can be a challange. Usually, a you will want the figure to go where it is in your code in relation to the paragraphs, so you will usually want to use the "here" or [h] placements. However, sometimes LaTeX will decide on a more 'optimal' placement which isn't. Sometimes this can be overcome by using an exlaimation point [h!].
Figure References
Again, according to the demo above, all that is required is that the figure be labelled with the \label{labelname} command, and then referenced with the \ref{labelname} command.
Table of Contents
Making a table of contents is easy. Just use chapters, sections, and subsections as necessary in your document, then right after your title add a "\tableofcontents" to the following line.
I also apply some extra features to my table of contents with some packages. It is easy to add links to the section labels on the pdf so a viewer can jump directly to a chapter, section, or subsection. I also like to have dots going from the label at the left to the page number at the right. On the full 8x11 sheet of paper, it is otherwise hard to line up which label goes to what number.
%make Table of Contents link to pages
\usepackage[pdfhighlight=/N,linkbordercolor={1 1 1}]{hyperref}
\hypersetup{
    colorlinks=false, %set true if you want colored links
    linktoc=all,      %set to all if you want both sections and subsections linked
    linkcolor=black,  %choose some color if you want links to stand out
}

%add dots to table of contents
\renewcommand{\cftsecleader}{\cftdotfill{\cftdotsep}}
Spacing
\vspace{} and \hspace{} are ways to add vertical and horizontal space respectively
Math Environment
Entering the Environment
Inline: To use a quick, inline math environment inside of a paragraph, just use the $ symbol. Example:
Here is inline math $ x^2 $. It is shown inside the rest of this paragraph.
Multi-Line: There are several ways to use a mult-line math environment. The most powerful is the align environment. It can be used with a \begin{align} and an \end{align}. As shown in the demo above, you can align parts of the equation (usually the equals) between lines.
| Name | Value | LaTeX Command |
|---|---|---|
| Alpha | α | \alpha |
| Beta | β | \beta |
| Delta | δ | \delta |
| Delta | Δ | \Delta |
| Pi | π | \pi |
| Gamma | γ | \gamma |
| Rho | ρ | \rho |
| Tau | τ | \tau |
| Theta | θ | \theta |
| Psi | Ψ | \psi |
| Phi | Φ | \phi |
| Omega | Ω | \Omega |
| Sigma | Σ | \Sigma |
| Degree | ° | ^\circ |
| Brackets | [] | \left[ \right] |
| Parenthesis | () | \left( \right) |
| Fraction | ⁄ | \frac{num}{denom} |
Symbols
These symbols only work in the math environment. So, if you want to use them in the paragraph of your text, use the inline math environment $ $.
Obviously, for the greek letters, all it takes to use them is to remember how to spell their name. Also, capitalizing the first letter of the name makes the letter the capital.
The sigma letter should not be used to make sums. There is a special command called sum. It can be used like this:
\sum\limits_{n=1}^9
The brackets and parenthesis are special in the math environment because they will grow larger as their contents become larger.
The fraction command seperates the fraction vertically similar to how you would write it. A frac takes up more vertical space than its surroundings so that the contents can be the same height. If this is not desired, you can use dfrac, which could be useful if you only wanted to say 1/2 instead of a having a longer numerator and denominator or if the fraction is inside of a matrix.
Subscripts and Superscripts
It is extremely easy to remember how to do subscripts and superscripts in the math environemnt. Simply use a ^ for superscript and _ for a subscript. The letter following the ^ or _ will be used as the script. If you want more than one letter in that space, you can wrap it in curly brackets {}. So, for example:
\[
x^2 \\ x^{1.5} \\ %superscript (exponents)
x_0 \\ x_{start}  %subscripts
\]
Advanced Usage
Inserting Code
There is a way to get LaTeX to essentially syntax-highlight and line-number code. Use the package listings. It has a bit of setup in the header. The result looks better, but it is difficult to copy and paste the code from the PDF into a text editor - which could be problematic.
Setup
\usepackage{color}
\usepackage{listings}
\lstset{ %
language=C++,                 % choose the language of the code
basicstyle=\footnotesize,     % size of the fonts that are used for the code
numbers=left,                 % where to put the line-numbers (left / none )
numberstyle=\footnotesize,    % font size used for the line-numbers
stepnumber=1,                 % lines between two line-numbers. (1=all numbered)
numbersep=5pt,                % how far the line-numbers are from the code
backgroundcolor=\color{white},% choose the background color.
showspaces=false,             % show spaces adding particular underscores
showstringspaces=false,       % underline spaces within strings
showtabs=false,               % show tabs within strings (add underscores)
frame=single,                 % adds a border/frame around the code
tabsize=2,                    % tabsize in spaces
captionpos=b,                 % sets the caption-position to bottom
breaklines=true,              % sets automatic line breaking
breakatwhitespace=false,      % automatic breaks should only happen at whitespace
escapeinside={\%*}{*)}        % if you want to add a comment within your code
}
Usage
\begin{lstlisting}
void setup() {
    Serial.begin(9600);
}

void loop() {
    Serial.println("HELLO WORLD");
    delay(1000);
}
\end{lstlisting}
Micro Typography
The microtype package applies some really subtle changes to the spacing and styling of the letters. If you compare side by side, the most noticable change is the alignment of paragraphs to headings looking more straight. It has some more advanced features, but it looks good even just keeping it simple:
\usepackage{microtype}
Presentations
It is actually possible to use LaTeX for presentations. PDF's actually work fairly well for slideshows since most PDF readers have a fullscreen slide viewer. Making a presentation in LaTeX using beamer requires more rigid structuring than a document, but still lets you use the same packages and interface that you are accustomed to in documents.
Unlike LaTeX's article document class, beamer does not have any particularly pleasant default styles, so the advantage to using LaTeX instead of an office suite isn't as clear for presentations as it is for documents.
HTML Introduction
HTML IntroductionIntroduction
HTML is the language that your browser reads when it shows you a webpage. It is a variant of XML. It makes the actual content that you see, but also can contain visual styling information (typically in the form of an external CSS file) and also can have an in-browser (client-side) programming language called JavaScript.
Bare Minimum Example
<!DOCTYPE html>
<html>
  <head>
    <title>Minimal</title>
  </head>
  <body>
    <p>Hello World!</p>
  </body>
</html>
Tag Structure
Tags are put on either end of something to describe the content between the tags. Since HTML is visual, think of a tag as a box drawn around whatever is inside of it. The outermost tags are <HTML>, <HEAD>, and <BODY>. The <HTML> tag simply says that the contents are HTML. It is the very outermost box on the screen. The <HEAD> tag is invisible. It summarizes the contents (like title and keywords) and also lists files the page needs like stylesheets and scripts - both of which can alternatively be embedded into the actual HTML file if desired instead of being a seperate file. The <BODY> tag is where the actual content that you see on in the browser window goes. It can contain images, text, and other containers.
Basic Tags
<p> - Paragraph
Paragraph tags are useful for providing that spatial seperation between paragraphs. To make a new line, use the self-closing <br /> tag. However, a paragraph is not a line break. the distance between the paragraphs is often a ratio of the line height, like 0.5 lines or 1.5 lines. In print, paragraphs also are indented - a style that can be modified with the text-indent CSS property. So, separating paragraphs by using a separate set of tags more flexible than using some number of line breaks.
<img /> - Image
The image tag is self-closing, which is why it requires the trailing slash. The URL of the image goes in the "href" attribute, and the alternative text if the image cannot be loaded goes in the "alt" attribute.
<img src="http://imgs.xkcd.com/comics/interblag.png" height="432" width="400"
 alt="An XKCD comic about blog names" />
<strong> - Bold
The strong tag makes text bold. Also, the <b> tag can be used, but it is considered outdated for some reason. Example:
<p> ... to <strong>boldly</strong> go where no man has gone before!</p>
<em> - Italics
The emphasis tag makes text italicized. The <i> tag can be used to make italics, but is also weirldy obsolete. Example:
<p><em>Emphasize</em> makes italics for some reason</p>
Lists
Lists are occasionally used in the body of text for readability, but in websites they are more commonly used for hierarchical (multi-level) navigation. As a general rule, lists should be incomplete sentences and not end with a period. At the very least, the sentence completeness should be consistent throughout the list.
<li> - List item
To make a single list element, wrap some text with <li> tags. This element must be within a list container. The type of container will decide whether there should be bullet points or numbers in front of the list item.
<ul> - Unordered list container
An unordered list element contains list items that have no particular order. This is the most common type of list. The default style applies a different kind of bullet point for each tier of the unordered list.
<ol> - Ordered list container
An ordered list element contains list items that must be in a particular order. it is primarily used for procedural lists that describe a chronological process (a step by step) or it can be used for rankings (a top 10).
The starting number can be chosen by the start attribute ex: <ol start="10">
Example Result
- Follow This Tutorial
- Discover that it is easy
- Tell your friends
- ???
- Profit
Example Code
<ol>
<li>Follow Tutorial
  <ul>
    <li>Discover it is easy</li>
    <li>Tell friends</li>
  </ul>
</li>
<li>???</li>
<li>Profit</li>
</ol>
Tables
The easiest way to learn to make a table is by example, but first here is a quick description of all the table related tags:
- <table> - the container for the whole table
- <thead> - the top area of the table (for categories)
- <th> - a table heading cell
- <tbody> - the main area
- <tr> - a table row
- <td> - a table cell
- <tfoot> - the bottom area (for totals)
- <caption> - a caption or title for the table
Example Result
| Sample ID | X | Y |
|---|---|---|
| 1 | 5000 | 100 |
| 2 | 6000 | 200 |
| Average | 5500 | 150 |
Example Code
<table>
  <thead>
    <tr>
      <th>Sample ID</th><th>X</th><th>Y</th>
    </tr>
  </thead>
  <tbody>
    <tr>
      <td>1</td><td>5000</td><td>100</td>
    </tr>
    <tr>
      <td>2</td><td>6000</td><td>200</td>
    </tr>
  </tbody>
  <tfoot>
    <tr><td>Average</td><td>5500</td><td>150</td></tr>
  </tfoot>
  <caption>Example Data Table</caption>
</table>
Selectors
Selectors are a way to identify an element in the page. They do nothing in a pure HTML page, but are almost necessary if you want to use CSS or JavaScript along with the page.
Identifier (unique)
An id attribute must be unique - the only one on the page with that name. They are particularly useful for JavaScript, since the browser provides a way to easily find an element given an ID, but finding a class is slower and harder.
IDs are prefixed by a # (pound) when used in CSS.
The identifier is specified with the id attribute. For example: <img src="/logo.png" id="logo" /> assigns the image the #logo identifier. It should not have spaces or hyphens.
Class (categorical)
A class can be either unique or assigned to multiple elements on the page.
classes are prefixed by a . (period) when used in css.
The class is specified with the class attribute. Multiple classes can be specified in a single class attribute by using spaces. A class may have a hyphen. For example: <p class="comment new">Hello</p> is a paragraph that is both in the .comment class and .new class.
Invisible Tags
It is often extremely useful to organize portions of the page using invisible style-less tags, then define a style specific for the ID or class. In reality, any tag can be made to behave like any other tag by overriding enough styles, but that would be wasteful and difficult to develop.
<div> - Division Block
Div tags are blocks by default. This means that they take up all of the available width and push anything after it to below. They are easier to space between other blocks. Many times these are used to section areas of the page like headings, sidebars, footers, and pages.
<span> - Text
Span tags are inline by default. So, they only take up the space they need and can be used inline with text. For example, <strong>, <em>, <a>, and <img /> are all inline by default. These are mostly useful for highlighting sections of text.
CSS Introduction
CSS IntroductionIntroduction
htmlTagName, #idname, .classname {
   stylename: stylevalue;
   color: black;
   font-size: 12px;
   background-color: #ddd;
}
CSS stands for Cascading Style Sheet. In HTML, you use it to apply a certain look to specific elements in the page. CSS makes it easy to give every page on your website a unified appearance. The format is extremely straightforward, but to be effective you need to know how to specify which element you want styled, find current styling information in a webpage, and you must be aware of all of the styles that can be applied to an element. The general form of a style in a CSS file is like the example shown to the right.
Specifiers
Specifiers tell the browser which elements to apply the style to.
- tags like <body>, <p>, <div>, and <span> are specified with just the text
- an ID in html is declared in the element like <div id="rightSidebar">, and specified in CSS like #rightSidebar
- a class in html is declared in the element like <div class="gallery">, and specified in CSS like .gallery
Specifiers may be chained in special ways to select more elements or narrow in on an element
- Multiple specifiers can use the same style by seperating the specifiers with comments
- #sidebar, .gallery {...} applies the style within the brackets to both the sidebar ID and gallery class.
- You can drill down to an class by seperating specifiers with a space
- #sidebar h3 {...} applies the style within the brackets to only h3 elements within the sidebar element
Styling
Color
There are several ways to pick a color. The numerical methods all are in the order of "red, green, blue", with low numbers being darker and higher numbers being lighter.
| Name | 3 digit hex | 6 digit hex | RGB | RGB+Alpha Transparency |
|---|---|---|---|---|
| black | #000 | #000000 | rgb(0,0,0) | rgba(0,0,0,1.0) |
| white | #FFF | #FFFFFF | rgb(255,255,255) | rgba(255,255,255,1.0) |
| red | #F00 | #FF0000 | rgb(255,0,0) | rgba(255,0,0,1.0) |
| green | #0F0 | #00FF00 | rgb(0,255,0) | rgba(255,0,0,1.0) |
| blue | #00F | #0000FF | rgb(0,0,255) | rgba(0,0,0,1.0) |
| grey | innaccurate | #808080 | rgb(129,129,129) | rgba(129,129,129,1.0) |
| transparent | N/P | N/P | N/P | rgba(0,0,0,0) |
| N/P | N/P | N/P | N/P | rgba(0,0,0,0.5) |
Styles List
Here are some sample styles applied to a div tag with the text "demo" inside of it.
| Style Name | Description | Sample Usage | Sample Result |
|---|---|---|---|
| color | The color of the font | color: #090; |
DEMO TEXT
|
| font-size | The size of the font, usually in px or em | font-size: 14px; |
DEMO TEXT
|
| font-style | Italicizes text | font-style: italics; |
DEMO TEXT
|
| font-weight | Controls the "boldness" of text | font-weight: bold; |
DEMO TEXT
|
| text-decoration | Underline, or overline, and strikethrough to text | text-decoration: underline; |
DEMO TEXT
|
| text-align | The horizontal positioning of text | text-align: center; |
DEMO TEXT
|
| vertical-align | The vertical positioning of text | vertical-align: middle; |
DEMO TEXT
|
| font-family | Name of font. Use web-safe fonts! | font-family: Serif; |
DEMO TEXT
|
| line-height | Spaces text lines. 2em is 'double spaced' | line-height: 2em; |
DEMO TEXT
|
| height width |
Controls the height/width of block elements | width: 40px; |
DEMO TEXT
|
| background-color | The background color of the box | background-color: #fff; |
DEMO TEXT
|
| background | Takes all background related styles Can do color, image, image position, repeats |
background: #fff url() no-repeat right 50%; |
DEMO TEXT
|
| border | A line around the box | border: 1px solid #090; |
DEMO TEXT
|
| border-radius | Rounds the edges of the box | border-radius: 8px; |
DEMO TEXT
|
| margin | Adds spacing to the outside of the box | margin: 5px; |
DEMO TEXT
|
| padding | Adds spacing to the inside of the box | padding: 5px; |
DEMO TEXT
|
| float | Pushes to side and surroundings wrap around it | float: right; |
DEMO TEXT
|
| display | inline: on same line as text like a span or img block: use width and obey margins like div inline-block: inline but can width and margin none: not shown at all |
display:inline; |
DEMO TEXT
|
| position | static: the normal way of position absolute: put at coordinates on screen relative: like absolute, but zero'd at static fixed: like absolute, but moves with scrolls note: nonstatic needs top, left, right, or bottom |
position: relative; left: 10px; |
DEMO TEXT
|
| z-index | Larger values are higher when overlapping | z-index: 10; | |
| text-shadow | adds a drop shadow to text. multiples by comma text-shadow: right down size color |
text-shadow: -1px 0 0 #fff; |
DEMO TEXT
|
| box-shadow | Adds drop shadow to the box. Similar parameters to text-shadow Shadows can be inset (inside the box). |
box-shadow: inset 0 0 2px #fff, 0 0 4px #000; |
DEMO TEXT
|
Other Style Information
As a general rule, you can use a shorthand to differentiate the different directions of a style either in the order or top, right, bottom, left or in the order top+bottom and left+right. It follows a clockwise rule, and saves a lot of typing particularly on the margin and padding styles. For example:
| Seperated | 4 direction shorthand | 2 direction Shorthand |
|---|---|---|
padding-top: 8px; |
padding: 8px 5px 8px 5px; |
padding: 8px 5px; |
Gradients can be made with this very simple generator.
The safe choices for fonts are really limited. With modern browsers, you can attach font files to pages. This process is made extremely easy with the Google Web Font API.
Development
As a general rule, you will want to have a local instance of the website you are developing for. If not, you can always test the css in-browser in chrome easily through menu > tools > developer tools. The magnifying glass in the bottom left will let you select an element visually on the screen. Then, the information on what styles are active and overridden is in the right column, and the tag's place in html is shown in the left. You can actually double click on just about anything in there and modify the contents of the page or the style information.
JavaScript and jQuery Introduction
JavaScript and jQuery IntroductionIntroduction
JavaScript is an actual programming language that is interpreted and run by your browser. It makes a webpage interactive and dynamic instead of just a rigid page that doesn't change once it's loaded. You can use it to send and recieve bits of information without having to load another page. It allows you to drag and drop elements, or react to clicks and hovers. You can even use it to make an in-browser game.
It is syntactically similar to Java. It requires semi-colons at the end of each statement. However, it does not have rigid data types. Any variable can store data of any type - sort of like python. In fact, a variable can even store a function or actually contain nothing (undefined).
jQuery
Many of the ways you would routinely use JavaScript are made drastically easier by using the jQuery library. jQuery provides a simplified interface for finding elements in a webpage, easy methods for modifying styles and appending content, simple functions for doing making fluid transition animations, and a reliable way to send and recieve data like JSON to a server asyncronously.
Setting Up jQuery
the jQuery .js file simply needs to be included in the pages scripts. This can be done really easily by using Google's hosted libraries. One of the advanatages to using Google's hosted libraries is that the file may already be cached in the user's browser.
<script src="//ajax.googleapis.com/ajax/libs/jquery/1.9.1/jquery.min.js"></script>
Using the JavaScript Console
The JavaScript console is extremely useful. In Chrome, it can be revealed by going to Options > Tools > Developer Tools > Console (the furthest tab to the right). This provides an interactive console. You can type a line of JavaScript, and you can read any errors or the output of any console.log() command in the JavaScript ran up until this point.
Searching for Elements
Elements in a webpage can be searched for extremely easily with jQuery. The the string used in the search is practically identical to the specifiers in CSS. ID's are specified with a # sign, classes are preceeded by a ., you can search for a specific drilldown by seperating specifiers by spaces, and seperate searches can be done simulteneously be using a comma.
results = $("#main .gallery img"); // gets img tags in gallery classes in main ID
Modifying Elements
Contents
To replace the contents of an element, you can use either the html or text method, where text will strip tags. Both the html and text methods can return the current contents of an element if the function is called without any parameters.
var titleText = $("#main h2.title").text() //gets the text in the heading tag
$("#main h2.title").text("New Title!");    //replaces the text in the heading tag
To add to the current contents at the end. Note that there is also a prepend method that adds to the beginning.
$("#main").append('<div class="new">New Stuff</div>');
Styles
Style information can be set and retrieved similar to the contents of an element. Select the element then use the css jQuery method to either retrieve or set the style by calling .css() with only the attribute or by calling it with both the attribute name and a value. It can also be called with a dictionary as an argument, with key value pairs corresponding to the css attribute names and values.
$("#comments .new").css("color", "#C00"); //adds to elements' style="" attribute
Another way to change the style of an element would be to simply toggle a class on the element, then defining the CSS in a stylesheet. jQuery provides a lot of methods for this, like checking whether an element has a class (hasClass), adding a class (addClass), switching back and forth whether an element has a class (toggleClass), and removing a class (removeClass).
Other style information can be easily retrieved and set in jQuery, like heights, widths, margins, positions on page, and scoll positions.
Animation
Styling can be easily animated with jQuery effects, which is possibly one of its most useful features.
Some animations are predefined all having to do with hiding and revealing elements, like: hide(), .slideDown(), slideUp(), fadeIn, fadeOut
$(".oops").hide()
Alternately, an animation can be completely customized with very little code by using the animate method. Many css values can be animated except colors, which requires jQuery UI. The first argument to animate is a dictionary of attributes and values for the styles, and the second argument is the duration of the animation in milliseconds.
$("#main").animate({ width: "50%" }, 1000 );
Events
Events are what make JavaScript truly interactive. They allow your script to react to changes.
Essentially, events are simply functions that are called whenever something happens. For example, if you want to make a webpage do something in response to a click, you simply say attach a function to an elements click event.
function reactionToEvent() {
   $(this).text("CHANGED!"); //change calling elements text
}

$("#mybutton").click(reactionToEvent);
Which is the same thing as:
$("#mybutton").click(function() {
   $(this).text("CHANGED!"); //change calling elements text
});
There are all kinds of events available. One of the most common ones used in jQuery is to delay actions until the document is loaded by using: $(document).ready(handler)
Here are some of the other most common ones:
click, mousedown, mouseup - React to button presses
hover - Reacts to the mouse entering or leaving an element
keydown, keypress - Reacts to keyboard button presses like hotkeys.
change - Reacts to form elements being altered like inputs, select boxes, and radio buttons
There are many more events available than that, but they may require the use of the jQuery bind method.
Sending and Receiving JSON
JSON is an awesome tool for sending structured data to and from a server. You can retain the data types of any JavaScript variable, like a dictionary that has arrays that have all kinds of different data types. It turns the data types into a structured and linear string, which is a process called serializing. For example, a CSV is a sort of a way of serializing a two dimensional array.
var stuff = {
   numbers: [0,1,3,6],
   on: True,
   comment: "Hello"
};

function successResponse(responseData) {
   console.log(responseData); // dumps the data to browser's console
}
function failResponse() {
   console.log("There was an error");
}

// send the stuff in JSON by POST to localhost and run the above function when done
$.ajax({
    type: "POST",
    url: 'localhost',
    dataType: 'json',
    data: stuff,
    success: successResponse
}).fail(failResponse);PD Feedback Control Introduction
PD Feedback Control IntroductionUses
A PD controller can be used in a real-time on a robot where a goal value can be both measured and controlled. A PD control is robust, which means that it can overcome unexpected behavior.
For example, a PD controller could be used in the cruise control on a car. The driver decides the goal speed and the controller in the car could see how fast the car is going, since cars have a speedometer. Under ideal conditions, all it would take to maintain speed is to keep the engine throttled at a predetermined constant amount. However, many unforseable factors can change how much gas is needed to maintain speed. For example, the quality of the gas, engine temperature, road incline, and wind speed. A controller needs to be able to overcome these unpredictable or difficult to measure sources of error to maintain a given speed and accelerate or decellerate as needed.
Premise
PD stands for proportion and derivative.
- Multiplying a constant (kp) to the "error" - or the difference between the desired and current values - will pull the output towards the desired value. A larger proportion constant means faster responses.
- Multiplying another constant (kd) to the rate of change in the error essentially says "slow down before you get there". It keeps the system from vibrating by anticipating the error. More anticipation means less vibration.
Analogy

Cars have shock absorbers and springs on each of their wheels. The springs try to keep the car a certain distance off the ground. This is like the proportion in a PD controller, but usually this "error" distance is zero. The shock absorber on a car is a damper, which helps the car to stop vibrating from the springs - just like the derivative portion of a PD controller.
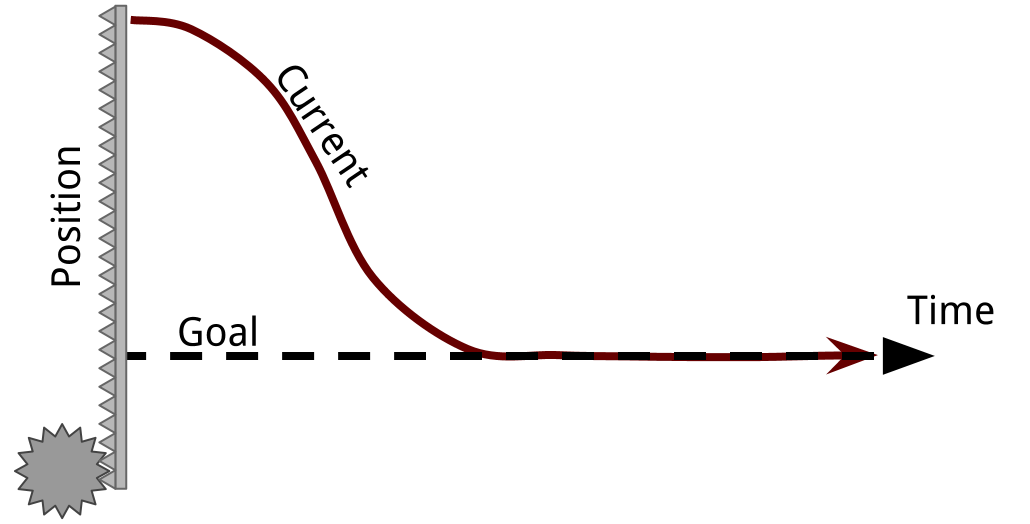
The similarity between the suspension system and a PD controller is due to the spring and damper pairing. Obviously, it is not exactly a control system. Rather, if you visualize the position graphs in terms of current position and goal position, you begin to see how a PD controller will behave.
Just like this suspension system controls the hight of a car based on the position of its tire, you can robustly control just about anything your robot has the ability to both affect and sense. It does not have to be a position. For example, you could control the temperature of an oven as long as you have control of the heating element and have a temperature sensor inside the oven.
An Example Problem
So, lets say you have a motor and an encoder that allows you to read the position of the motor. You want the motor to go to a goal position of your choosing. This motor is attached to a vertical rack and pinion so that the graph is easy to visualize.
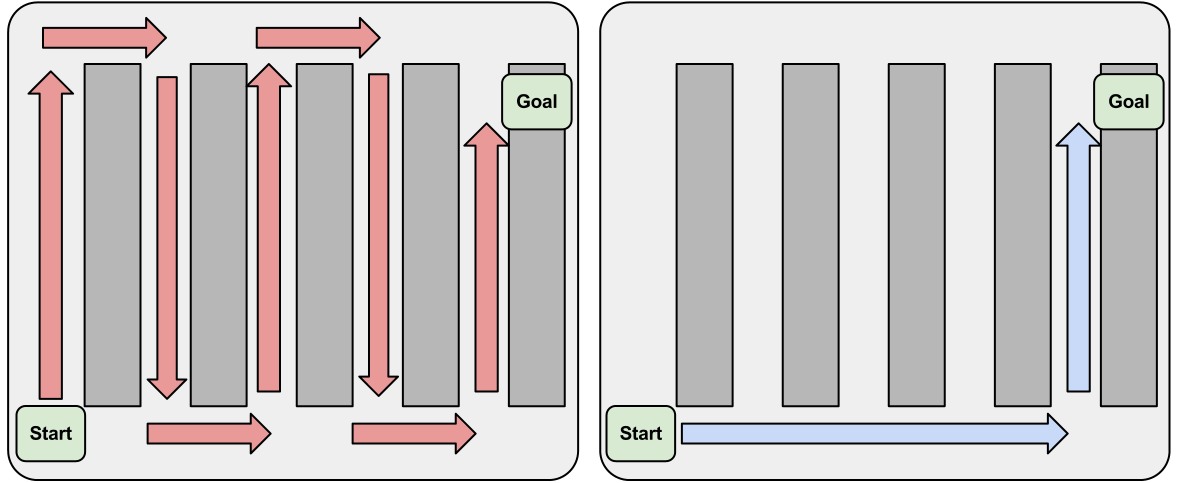
Bad Solution
You could say "if you're not there, go towards the goal", like this Arduino code:
if ( position < goal ) {       // too low
    goUp();                    // set direction
    analogWrite(motor, 255);   // go full speed
}
else if ( position == goal ) { // at goal
    analogWrite(motor, 0);     // stop
}
else if ( position > goal ) {  // too high
    goDown();                  // set direction
    analogWrite(motor, 255);   // go full speed
}
 The problem here is that many times the system will have sufficient momentum to keep going even though there is no more current and no force being applied by the motor. Unless there is sufficient friction, you will overshoot the goal. If this happens once, it'll probably happen on the next pass too - resulting in vibration. This is obviously undesirable since the system never rests at the goal position, wastes energy, and will wear down unecessarily.
Good Solution
Now lets simply change the code on the Arduino microcontroller to use a PD control.
// the PD controller requires speed be calculated
int output = Kp*(goal-position) - Kd*speed

if ( output >= 0 ) {               // positive
    goUp();                        // set direction
    analogWrite(motor,  output);   // go partial speed
}
else {                             // negative
    goDown();                      // set direction
    analogWrite(motor, -output);   // go partial speed
}
Note that this new PD control requires the speed, not just the position. This is not usually a problem, since a microcontroller is usually pretty good at keeping time. You can simply keep track of the change in position divided by the change in time. This requires a little more code on the Arduino.
unsigned long now = micros(); // store the current time in "now"

// change in position over change in time
speed = ( position - lastPosition ) / ( now - lastTime )

// this measurement is now the previous one
lastPosition = position;
lastTime = now;
Depending on the values that you pick for the variables Kp and Kd, you could get two different kinds of behaviors: damped vibration (left), or a critically/over damped system (right).

Choosing Values
Picking the right Kp and Kd values is important. To some extent, you can just do it by trial and error.
| Desired Result | Change |
|---|---|
| Get There Fast (low rise time) | Smaller Kp |
| Less Overshoot | Smaller Kp, Larger Kd |
| Less Vibration | Larger Kd |
It is no exagguration to say that there is a science to picking the right parameters, though. They can actually be precisely chosen by using math. Essentially, you need to be able to describe what you are controlling with an equation to make a transfer function, then find the characteristic equation. It's actually a lot easier than it sounds.
Using Node.js as a web server
Using Node.js as a web serverIntroduction
Node.js is JavaScript that can be run outside of a browser. It is often used to make a fast server for dynamic content.
Probably one of the biggest advantages to Node.js, aside from being one of the fastest and easiest to learn server environments, is that JavaScript is the lanugage used on browsers, allowing you to program both the server and client in the same language.
Example
First, download and install node.js
Then, start the example by usign the command:
nodejs server.js
This example starts by sending a static HTML form when you visit http://localhost:8080/. It looks like the image below:
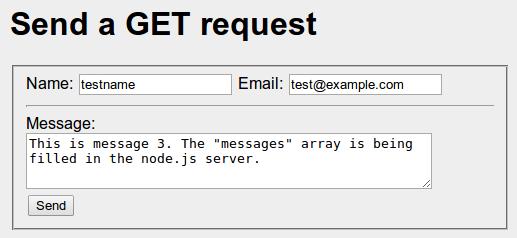
Clicking the submit button on the form sends a get request to http://localhost:8080/submit. It looks like the image below.
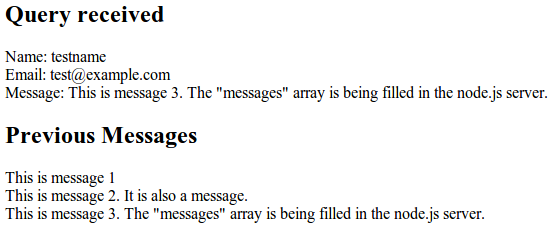
The interesting part of this script is the (url_parts.pathname == '/submit') condition. This is where the dynamic page generation happens. It starts by just regurgitating the information it was sent in the form. Note that the variable names of the url_parts.query.varname match up to the "name" attribute in each of the form elements. One of the most powerful features of node.js is that the program remains running between requests, unlike PHP. As a result, we can store variables which can retain their values as long as the process stays running. Storing any really important information this way is a bad idea, since a crash or shutdown would cause the data to disappear. A database can be used, such as MySQL. However, probably the most popular database for node.js servers is MongoDB, which uses JSON encoded data.
This form would also work by POST, if the form method were changed from GET to POST.
var http = require('http'); // these lines are somewhat similar to #include in C++
var util = require('util'); // except that the left hand side is an object/variable
var url = require('url');
var fs = require('fs');

// provide a "database"
messages = []

var server = http.createServer(function (req,res){
	 // parse the URL
	var url_parts = url.parse(req.url,true);

	// functions to serve static files
	function sendHTML(filepath) {
		// read the file asyncronously
		fs.readFile(filepath,function(error,contents){
			// once the file is loaded, this function runs
	    	console.log('Serving the html ' + filepath);
	    	res.end(contents); // end the request and send the file
	    });
	}
	function sendCSS(filepath) {
		// once the file is loaded, this function runs
		fs.readFile(filepath,function(error,contents){
	    	console.log('Serving the css ' + filepath);
	    	res.end(contents); // end the request and send the file
	    });
	}

	// serve the index page from a static file
	if( url_parts.pathname == '/' ) {
		sendHTML('./form.html');
	}
	// serve the CSS page from a static file
	else if ( url_parts.pathname == '/style.css') {
		sendCSS('./style.css')
	}
	// generate a dynamic page
	else if ( url_parts.pathname == '/submit' ) {
		var html = '<html><body>'; // begin the minimal html structure
		html += "<h2>Query received</h2>";
		html += "Name: " + url_parts.query.name;
		html += '<br />';
		html += "Email: " + url_parts.query.email;
		html += '<br />';
		html += "Message: " + url_parts.query.message;
		html += '<br />';

		html += '<h2>Previous Messages</h2>';
		messages.push(url_parts.query.message)

		// loop through the old messages
		for(m in messages) {
			html += messages[m];
			html += '<br />';
		}

		html += '</body></html>'; // end the minimal html structure

		res.end(html); // end the request and send the response HTML
	}
	// if the url was not recognized, 404
	else {
		res.writeHead(404) // put a header for not found
		// print the page and end the request
		res.end("<h1>404 - Path not recognized</h1>");
	}
 });

server.listen(8080);
util.log('Server listenning at localhost:8080');