Raspberry Pi
Raspberry PiThe Raspberry Pi is like a cross between a microcontroller like the Arduino and a full Linux desktop computer. It is much more computationally capable than an Arduino, and has the advantage of being able to use PC grade hardware like monitors, speakers, and nearly any USB device. However, it does not have as many GPIO pins available and operates at 3.3V instead of 5V like many Arduinos. The reason is that the Raspberry Pi is actually designed to be an inexpensive computer, not a microcontroller. It is inexpensive at just $25 or $35, and is extremely popular. As a result, there is a lot of support and documentation around for it, unlike other micocromputers.
One of the great advantages of a microcomputer, aside from the improved hardware and peripheral support, is that you get to use high level programming languages like python and even OpenGL for 3D displays. Image processing is easily done using simple webcams and using OpenCV, which the Arduino is far too underpowered to do. Since the Raspberry Pi is so popular, there are some great libraries that make it very easy to interface with the GPIO - even ones that imitate the familiar Arduino interface.
Raspberry Pi Introduction
Raspberry Pi IntroductionSetup
The Raspberry Pi minimally needs a micro USB-B cord to power it. If you have a phone charger, aside from an iPhone, it will likely use this cable since the EU made it mandatory for smartphones. So, you probably don't even need to buy another wall adapter or cable if you look around. You can also plug it into a computer to power it, though you are not able to communicate with the computer over it. Additionally, an Ethernet cable connecting it to the same LAN as a computer is one of the easiest ways to get started. Unless you can figure out what IP address the Raspberry Pi will get, you will also need a keyboard and a monitor or tv capable of using either HDMI or the yellow RCA connector.
The Raspberry Pi does not come with an SD card, which you will also need. You will need to install an operating system on it as well, so it should be at least 4GB to be comfortable. Some SD cards are faster than others. Higher speed is denoted by a higher "class" number. This class will primarily effect install, startup, and upgrade times and there is no mandatory minimum.
SD Installation
Once you have it all set up, you will need to install the operating system to the SD card. I do not know of any reason not to use Raspbian unless you are both very experienced in Linux and already familiar with the Raspberry Pi (why would you be reading this?). Head over to the download page and get an up to date image of Raspbian. Then extract the .img from the .zip using whatever you usually use to unzip a file.
- Linux & Mac: sudo dd if=path_of_your_image.img of=/dev/XXXX bs=1M
- Windows: Use Win32DiskImager
Be extra sure to "eject" the disk after the imager is done regardless of the OS you use. You might be able to get away with it most of the time, but there will definitely be some changes waiting in the buffer even if you use dd.
Booting
Simply plug in the Raspberry Pi with the SD card and everything plugged into it. There is no power button. The default login username is "pi" and the password is "raspberry"
Raspbian GNU/Linux 7 raspberrypy tty1
raspberrypi login: pi
password:
It is completely normal for the password field to not show any of your typing. It is a security feature.
GUI
If you want to start into a graphical environment, all you need to do is type "startx" and then hit enter.
pi@raspberrypi ~ $ startx
Updating and Installing
Installing and upgrading things on your Raspberry Pi is really easy, but a little different than usual. The easiest way requires a little learning. If you don't want to learn the easy way, you'll still have to follow along a little bit.
First, open a terminal. You can get one either by not running startx after a boot, or by clicking LXTerminal on your desktop. This terminal is one of the reasons why Linux is so great for developers. Just about anything can be done from here easily once you know what to type.
pi@raspberrypi ~ $ sudo apt-get update
pi@raspberrypi ~ $ sudo apt-get install synaptic
The two commands above can be broken into parts. "sudo" says "do this as super user", which gives you administrative abilities for that command. "apt-get" is a program that manages software on the computer and can install or upgrade them from the internet. the "update" argument tells "apt-get" to check the server for new software, but not to actually upgrade or install anything.
The second command tells "apt-get" to "install" the software called "synaptic". The Synaptic Package Manager is essentially a graphical way to do the same thing as apt-get. It is probably not installed by default because it requires so many other programs be installed in order to work. apt-get automatically finds and installs these programs for you before installing synaptic.
If you don't want to learn this terminal based way of installing and updating things, you can just use Synaptic. "startx" if you haven't already, and click the icon in the bottom left and hover over "other" and scroll down to find "Synaptic Package Manager". From there, things should be pretty self explainatory.
Now, to upgrade all the software on your system at once, all you need to do is:
pi@raspberrypi ~ $ sudo apt-get upgrade
Just one command and everything installed on there can be upgraded to the newest version.
If you don't know exactly what you're looking for when you want to install something, you can find it relatively easily from the command line. The first thing you should check is not by opening a web browser and trying downloading the software. You will, first, probably not find anything compatible with your Raspberry Pi, and it will not be automatically updated if it were. Instead, try:
pi@raspberrypi ~ $ apt-cache search worms
atanks - tank-battling game
bsdgames - collection of classic textual unix games
hedgewars - Worms style game
labrea - a "sticky" honeypot and IDS
libspf2-2 - library for validating mail senders with SPF
libspf2-dev - Header and development libraries for libspf2
p3scan - transparent POP3-proxy with virus- and spam-scanning
spfquery - query SPF (Sender Policy Framework) to validate mail senders
warmux - turn-based artillery game on 2D maps
warmux-dbg - debugging symbols for the WarMUX game
warmux-servers - stand alone server and game index server for WarMUX
pi@raspberrypi ~ $ sudo apt-get install hedgewars
"apt-cache search" searches the descriptions of the easily available software. In this example, I wanted a game similar to Worms, and found hedgewars. Once you find what you are looking for, you use "apt-get install" to install the software.
Remote Access
Once you have things set up, you can access a command prompt to the Raspberry Pi from another computer by installing:
pi@raspberrypi ~ $ sudo apt-get install openssh-server avahi-daemon
This installs the openssh server, which is probably already installed, and the avahi-daemon, which lets you connect using the Raspberry Pi's name rather than the IP address.
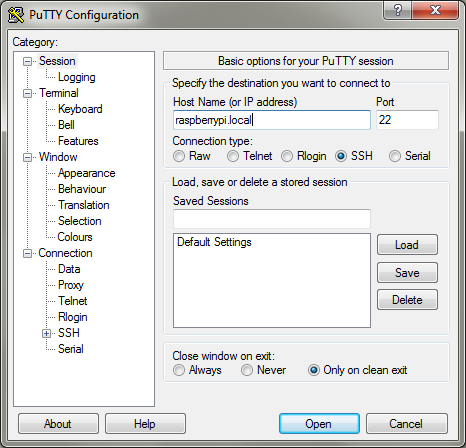
From the other computer, use either PuTTY or ssh if you are on Windows or Mac/Linux respectively.
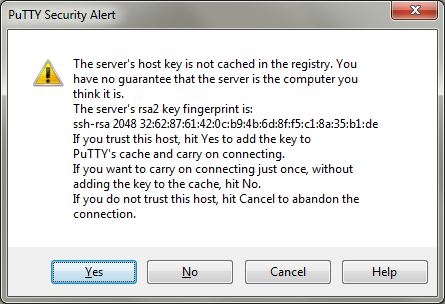
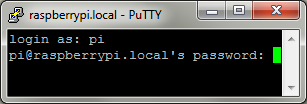
Windows does not resolve .local addresses by default. I believe this is solved if you even have so much as iTunes installed, but if not, you may have to install Bonjour. If you don't want to do that, you can follow the IP address method shown below. Once in putty, simply enter raspberrypi.local in the hostname field, or the IP if the .local name is not working. It will warn you about the fingerprints because you have not connected to this device before. Hit yes and PuTTY will remember this fingerprint for next time and warn you if it changes. Then login as "pi" and use the password "raspberry".
From Linux or a Mac, run the command:
ssh pi@raspberrypi.local
If you can't connect, try using the Raspberry Pi's IP address, which can be found by running the ifconfig command:
pi@raspberrypi ~ $ ifconfig
eth0      Link encap:Ethernet  HWaddr b8:27:eb:5d:a4:c8
          inet addr:192.168.1.101  Bcast:10.0.0.255  Mask:255.255.255.0
          UP BROADCAST RUNNING MULTICAST  MTU:1500  Metric:1
          RX packets:12776 errors:0 dropped:0 overruns:0 frame:0
          TX packets:3604 errors:0 dropped:0 overruns:0 carrier:0
          collisions:0 txqueuelen:1000
RX bytes:12519918 (11.9 MiB) TX bytes:625071 (610.4 KiB)Raspberry Pi Pinout and IO
Raspberry Pi Pinout and IO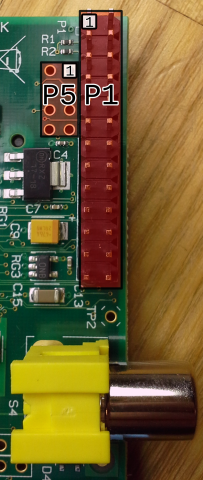 There are some great libraries that make it really easy to use the pins on the Raspberry Pi. It has relatively few pins and are a little less powerful than what you might expect from a microcontroller. Aside from those limitations, you should also keep in mind that pin manipulation is not done in a real time environment. Unlike an Arduino, which only runs your program, the Raspberry Pi takes turns running many programs like a normal desktop. While your program might be able to recieve the majority of the processor's attention, it will not be able to use all of it. Likewise, timing events may be slightly less reliable too. As great as Python is, it is even less reliable because of a process called garbage collection. It is not a problem for most situations, but it is definitely something to keep in mind.
There are two kinds of numbers to specify which pin you want to use. There is the physical pin number, which altenate sideways increasing from top to bottom. For nearly any device, if you look carefully on the board, there is an indicator near the "1" pin on a header. This is even true of integrated circuit (IC) chips. Unlike with ICs, orienting the pins with that indicator in the top left, the pin numbers are increased from left to right and top to bottom. The reason this appears differently on P5 is because the indicator is on the bottom side.
The BCM GPIO number is the number that the processor uses to differentiate the pins. Obviously, pins like 5V and GND cannot be addressed since they only have their one purpose and cannot be changed. As a result, the BCM number is different than the header number. It is important to keep track of which addressing system you are using. It might help you to remember that BCM is a reference to the signal name on the Broadcom datasheet for the processor on the Raspberry Pi.
You should also know that the pinout information only pertains to the revision 2 version of the board. You can tell that you are not using a revision 1 board by the presense fo the P5 holes. P5 was added in revision 2. Revision 1 is essentially the same, but has quite a few pins missing.
| BCM GPIO# | Name | Header | Name | BCM GPIO# | |
|---|---|---|---|---|---|
| 3.3V | 2 | 1 | 5V | ||
| 29 | GPIO9 | 4 | 3 | GPIO8 | 28 |
| 31 | GPIO11 | 6 | 5 | GPIO10 | 20 |
| GND | 8 | 7 | GND | ||
| BCM GPIO# | Name | Header | Name | BCM GPIO# | |
|---|---|---|---|---|---|
| 3.3V | 1 | 2 | 5V | ||
| 2 | SDA* | 3 | 4 | 5V | |
| 3 | SCL* | 5 | 6 | GND | |
| 4 | GPIO7 | 7 | 8 | TX | 14 |
| GND | 9 | 10 | RX | 15 | |
| 17 | GPIO0 | 11 | 12 | PWM0 | 18 |
| 27 | GPIO2 | 13 | 14 | GND | |
| 22 | GPIO3 | 15 | 16 | GPIO4 | 23 |
| 3.3V | 17 | 18 | GPIO5 | 24 | |
| 10 | SPI MOSI | 19 | 20 | GND | |
| 9 | SPI MISO | 21 | 22 | GPIO6 | 25 |
| 11 | SPI SCLK | 23 | 24 | SPI CE0 | 8 |
| GND | 25 | 26 | SPI CE1 | 7 | |
*The i2c pins conveniently have 1.8 kΩ pullup resistors.
Each of these pins have their own limitations:
| Pin Type | Max Current |
|---|---|
| 3.3V | 50mA |
| 5V | 200mA |
| GPIO | 16mA @ 3.3V |
| Total GPIO | 51mA |
| Input High | >1.3V |
| Input Low | <0.8V |
It might be possible that the "total GPIO" and "3.3V" limitations both refer to the same number. Needless to say, in any case you really cannot put much on the GPIO or 3.3V power. Really, it's just two LEDs and you're already at 40-60mA.
Given the voltage and current limits of these pins, you will likely find yourself needing ways around them. A logic level converter is good for interfacing 3.3V serial and GPIO to 5V devices. Shift registers and I/O port expanders are both good for both being able to deliver more current and adding more pins. There are all sorts of ways around these limitations, but simple stuff like MOSFETS, transistors, and voltage regulators can be the most effective. There are also no analog inputs, so to read voltage you can use an Analog to Digital Converter (ADC). One way to get around all of these limitations is to use an ATmega or Arduino for any controls, and just use the Raspberry Pi for anything resource intensive, but interfacing the two still requires a logic level converter since they usually operate at different voltages. There are 3.3V Arduino variants though.
Using the GPIO Pins
GPIO is easily done with the rpi-gpio python package. First, make sure you have it installed by opening a terminal (like LXterminal)
sudo apt-get update
sudo apt-get install python-dev python-rpi.gpio
Then, just make a plain text file using whatever editor you like containing something like this:
import RPi.GPIO as io
import time

io.setmode(io.BCM)
# io.BCM says use the BCM GPIO numbering system for pins.
# io.BOARD will use the actual "header" numbers.

# reading from a GPIO pin
inputPinNumber = 18                     # the BCM GPIO pin number, 12 if io.BOARD
io.setup(inputPinNumber, io.IN)         # similar to pinMode in Arduino
if io.input(inputPinNumber):            # read the pin, use in if condition
    print("Pin 18 is high")
else:
    print("Pin 18 is low")

# writting to a GPIO pin
outputPinNumber = 23                    # the BCM GPIO pin number, 16 if io.BOARD
io.setup(outputPinNumber, io.OUT)
while True:                             # loop forever
    io.output(outputPinNumber, io.HIGH) # set the pin output to high (3.3V)
    time.sleep(0.5)                     # wait a half a second
    io.output(outputPinNumber, io.LOW)  # set the pin output to low (0V)
    time.sleep(0.5)                     # wait another half a second before looping
You will need to run it as root, since GPIO manipulation requires root priviliges.
pi@raspberrypi ~ $ sudo python pinIOtest.py
Using i2C and SPI
These serial connections require a little more setup because they require kernel modules, which are like drivers. They disabled them by default because "many users don't need them". I guess we are one of the few, huh?
You can copy these lines to a terminal like LXterminal or in SSH. The stuff after the # is just comments to explain what they do. You don't need to retype it, but it won't hurt if you're copy and pasting either.
sudo rm /etc/modprobe.d/raspi-blacklist.conf # remove their "disable"
sudo modprobe i2c-bcm2708 i2c-dev            # enable modules now without restart
echo i2c-bcm2708 | sudo tee /etc/modules     # add the i2c driver to startup
echo i2c-dev | sudo tee /etc/modules         # add other i2c driver to startup
sudo apt-get install python-smbus i2c-tools  # install some useful i2c tools
Now you can see what's connected to i2c with this neat command:
pi@raspberrypi ~ $ sudo i2cdetect -y 1
     0  1  2  3  4  5  6  7  8  9  a  b  c  d  e  f
00:          -- -- -- -- -- -- -- -- -- -- -- -- --
10: -- -- -- -- -- -- -- -- -- -- -- -- -- -- -- --
20: 20 -- -- -- -- -- -- -- -- -- -- -- -- -- -- --
30: -- -- -- -- -- -- -- -- -- -- -- -- -- -- -- --
40: -- -- -- -- -- -- -- -- -- -- -- -- -- -- -- --
50: -- -- -- -- -- -- -- -- -- -- -- -- -- -- -- --
60: -- -- -- -- -- -- -- -- -- -- -- -- -- -- -- --
70: -- -- -- -- -- -- -- --
The output shows that there is a device connected to the i2c bus and has an address of 20. This is the default address for an MCP230 port expander, which is what I have hooked up to it. If nothing were hooked up to the SCL and SDA that was i2c compatible, there would be "--" there, just like everything else.
Now, to use i2c in a Python program, use the SMBus package:
import smbus
bus = smbus.SMBus(1)
address = 0x20
write_byte(addr,val)
read_byte(addr)
Syncing Files on the Raspberry Pi
Syncing Files on the Raspberry PiIntroduction
Syncing files automatically from a Raspberry Pi is a good idea to make sure that nothing gets lost the Pi breaks. The problem is that due to the unusual ARM architecture, most of the common methods for syncing are not available. Dropbox does not have an ARM package. Google Drive never had a Linux client. There are ways around these limitations either by use of lower quality third party applications to interface with the major sync solutions or by use of open source and self hosted solutions.
Sparkleshare
Sparkleshare is a self-hosted solution. Sparkleshare uses Git on its backend, so it's particularly good for text files. You can also use a git host like Bitbucket. It provides an easy to use graphical interface and is very easy to set up
On the Raspberry Pi:
pi@raspberrypi:~# sudo apt-get install sparkleshare
Building Sparkleshare (unnecessary if using the package from apt-get):
#install all mono stuff, which is probably (definitely) overkill
pi@raspberrypi:~# sudo apt-get install libmono-2.0-dev mono-complete gtk-sharp2 libwebkit-cil-dev libnotify0.4-cil libnotify-cil-dev
pi@raspberrypi:~# mkdir apps ; cd apps
pi@raspberrypi:~# wget <getrecentlink>.tar.gz
pi@raspberrypi:~# tar -xzf sparkleshare-linux-1.1.0-tar.gz
pi@raspberrypi:~# cd sparkleshare-1.1.0/
pi@raspberrypi:~# ./configure
pi@raspberrypi:~# make
pi@raspberrypi:~# sudo make install
On your "host" computer (unnecessary if using third party Git host)
root@evan-ubuntu:~# sudo su && cd # Fetch the Dazzle script root@evan-ubuntu:~# curl https://raw.github.com/hbons/Dazzle/master/dazzle.sh \ --output /usr/bin/dazzle && chmod +x /usr/bin/dazzle # Run the initial setup root@evan-ubuntu:~# dazzle setup # Link SparkleShare clients using their Client ID found in the status menu root@desktop:~# dazzle link
Paste your Client ID (found in the status icon menu) below and press <ENTER>. Client ID: ssh-rsa AAAAB3NzaC1yc2EAAAADAQ... ... ...TnTL4SK1+7gYKT raspberrypi # Create a new project. Add as many as you need root@evan-ubuntu:~# dazzle create raspberry # raspbery project or directory name
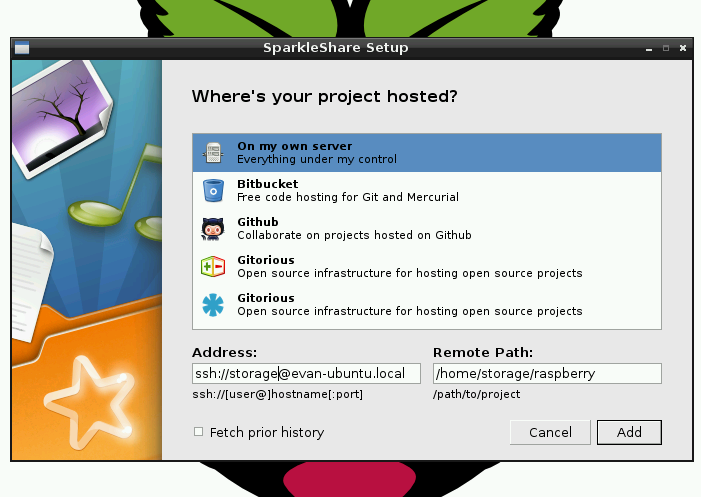
Project "raspberry" was successfully created. To link up a SparkleShare client, enter the following details into the "Add Hosted Project..." dialog: Address: ssh://storage@evan-ubuntu.local Remote Path: /home/storage/raspberry
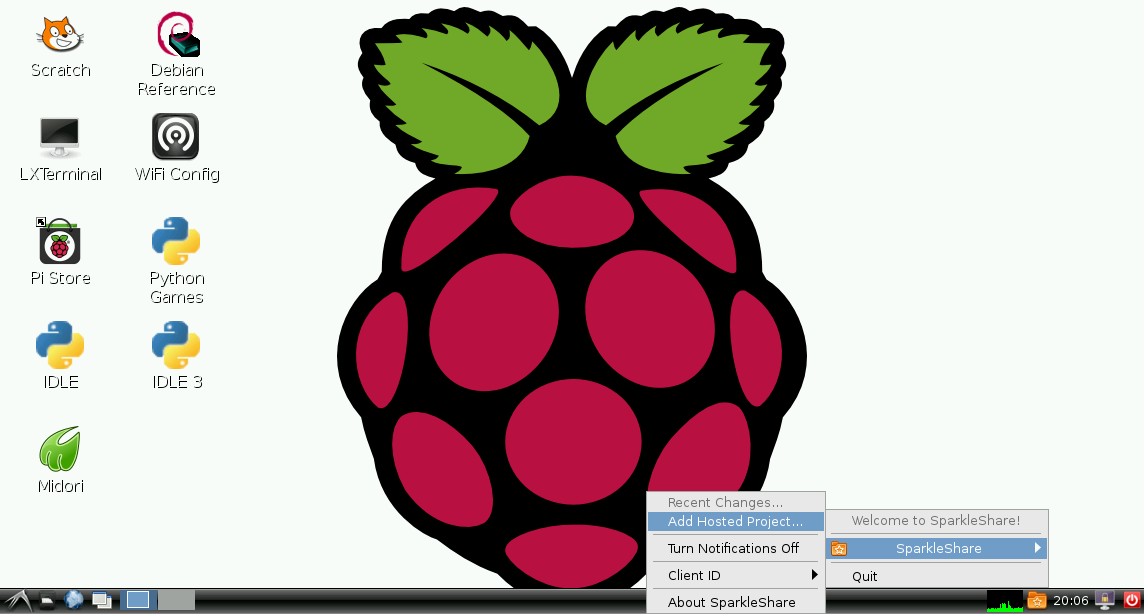
Setup on the client side uses a GUI:
pi@raspberrypi:~# DISPLAY=:0 sparkleshare start


Grive
Grive is the unnofficial Google Drive client for Linux. Google has no official linux client, but in this specific case that is actually a good thing, in a weird way, because the open source version can be built from source and can run on the Raspberry Pi's ARM processor.
First, try installing from the repos. In a lot of debian archives, grive is now available. At the point of writting this though, it is not currenlty in the Raspbian repo, but is in other Debian repos.
pi@raspberrypi ~ $ sudo apt-get install grive
Building Grive from Source
If that package does not work, you can build it from source, but it takes a really long time to build.
This will add quite a few packages to your Raspbian - a couple hundred MB worth, which takes more than a couple minutes to install. The build also takes about 20 minutes.
sudo apt-get install cmake git build-essential libgcrypt11-dev libjson0-dev libcurl4-openssl-dev libexpat1-dev libboost-filesystem-dev libboost-program-options-dev binutils-dev libqt4-core libqt4-dev libboost-test-dev libboost-filesystem-dev libboost-program-options-dev libboost-system-dev libyajl-dev

pi@raspberrypi $ mkdir ~/apps ; cd ~/apps
pi@raspberrypi ~/apps $ git clone git://github.com/Grive/grive.git
pi@raspberrypi ~/apps $ cd grive
pi@raspberrypi ~/apps/grive $ cmake .
-- Found libgcrypt: -L/lib/arm-linux-gnueabihf -lgcrypt
-- Found JSON-C: /usr/lib/arm-linux-gnueabihf/libjson.so
-- Boost version: 1.49.0
-- Found the following Boost libraries:
--   program_options
--   filesystem
--   unit_test_framework
--   system
-- Found libbfd: /usr/lib/libbfd.so
-- Found libiberty: /usr/lib/libiberty.a
-- Boost version: 1.49.0
-- Found the following Boost libraries:
--   program_options
-- Boost version: 1.49.0
-- Configuring done
-- Generating done
-- Build files have been written to: /home/pi/apps/grive
If you do not add these scope resolution operators, the compiler does not seem to know to use the Boost library. It might also have to do with the sizes of variables on the ARM processor versus normal.
pi@raspberrypi ~/apps/grive $ nano libgrive/src/drive/State.cc
void State::Write( const fs::path& filename ) const
{
        Json last_sync ;

        last_sync.Add( "sec", Json((boost::uint64_t) m_last_sync.Sec() ) );
        last_sync.Add( "nsec", Json((boost::uint64_t) m_last_sync.NanoSec() ) );

        //last_sync.Add( "sec", Json(m_last_sync.Sec() ) );
        //last_sync.Add( "nsec",        Json(m_last_sync.NanoSec() ) );

        Json result ;
        result.Add( "last_sync", last_sync ) ;

        //result.Add( "change_stamp", Json(m_cstamp) ) ;
        result.Add( "change_stamp", Json((boost::uint64_t) m_cstamp) ) ;

        std::ofstream fs( filename.string().c_str() ) ;
        fs << result ;
}
Now that you've patched it a little bit, you can actually build it. This takes a while.
pi@raspberrypi ~/apps/grive $ make
[  1%] Building CXX object libgrive/CMakeFiles/grive.dir/src/json/JsonParser.cc.o
/tmp/ccN9aaS9.s: Assembler messages:
/tmp/ccN9aaS9.s:1258: Warning: swp{b} use is deprecated for this architecture
[  3%] Building CXX object libgrive/CMakeFiles/grive.dir/src/json/ValBuilder.cc.o
/tmp/cc0qtdOv.s: Assembler messages:
/tmp/cc0qtdOv.s:1317: Warning: swp{b} use is deprecated for this architecture
[  5%] Building CXX object libgrive/CMakeFiles/grive.dir/src/json/JsonWriter.cc.o
[  7%] Building CXX object libgrive/CMakeFiles/grive.dir/src/json/ValResponse.cc.o
[  8%] Building CXX object libgrive/CMakeFiles/grive.dir/src/util/File.cc.o
/tmp/ccCrhkFO.s: Assembler messages:
/tmp/ccCrhkFO.s:1317: Warning: swp{b} use is deprecated for this architecture
[ 10%] Building CXX object libgrive/CMakeFiles/grive.dir/src/util/Config.cc.o
[ 12%] Building CXX object libgrive/CMakeFiles/grive.dir/src/util/StdStream.cc.o
[ 14%] Building CXX object libgrive/CMakeFiles/grive.dir/src/util/Exception.cc.o
/tmp/cca93GMZ.s: Assembler messages:
/tmp/cca93GMZ.s:1298: Warning: swp{b} use is deprecated for this architecture
[ 16%] Building CXX object libgrive/CMakeFiles/grive.dir/src/util/OS.cc.o
/tmp/cchdH7ge.s: Assembler messages:
/tmp/cchdH7ge.s:1258: Warning: swp{b} use is deprecated for this architecture
[ 17%] Building CXX object libgrive/CMakeFiles/grive.dir/src/util/DateTime.cc.o
/tmp/ccnsT4HV.s: Assembler messages:
/tmp/ccnsT4HV.s:1258: Warning: swp{b} use is deprecated for this architecture
[ 19%] Building CXX object libgrive/CMakeFiles/grive.dir/src/util/StringStream.cc.o
[ 21%] Building CXX object libgrive/CMakeFiles/grive.dir/src/util/SignalHandler.cc.o
[ 23%] Building CXX object libgrive/CMakeFiles/grive.dir/src/util/Crypt.cc.o
/tmp/ccx344KH.s: Assembler messages:
/tmp/ccx344KH.s:1258: Warning: swp{b} use is deprecated for this architecture
[ 25%] Building CXX object libgrive/CMakeFiles/grive.dir/src/util/MemMap.cc.o
[ 26%] Building CXX object libgrive/CMakeFiles/grive.dir/src/util/log/CompositeLog.cc.o
[ 28%] Building CXX object libgrive/CMakeFiles/grive.dir/src/util/log/DefaultLog.cc.o
[ 30%] Building CXX object libgrive/CMakeFiles/grive.dir/src/util/log/CommonLog.cc.o
[ 32%] Building CXX object libgrive/CMakeFiles/grive.dir/src/util/log/Log.cc.o
[ 33%] Building CXX object libgrive/CMakeFiles/grive.dir/src/xml/String.cc.o
[ 35%] Building CXX object libgrive/CMakeFiles/grive.dir/src/xml/NodeSet.cc.o
/tmp/ccshU8Rr.s: Assembler messages:
/tmp/ccshU8Rr.s:1284: Warning: swp{b} use is deprecated for this architecture
[ 37%] Building CXX object libgrive/CMakeFiles/grive.dir/src/xml/Node.cc.o
/tmp/cc03tDy6.s: Assembler messages:
/tmp/cc03tDy6.s:1284: Warning: swp{b} use is deprecated for this architecture
[ 39%] Building CXX object libgrive/CMakeFiles/grive.dir/src/xml/TreeBuilder.cc.o
/tmp/ccEaKl2M.s: Assembler messages:
/tmp/ccEaKl2M.s:1258: Warning: swp{b} use is deprecated for this architecture
[ 41%] Building CXX object libgrive/CMakeFiles/grive.dir/src/bfd/Debug.cc.o
[ 42%] Building CXX object libgrive/CMakeFiles/grive.dir/src/bfd/SymbolInfo.cc.o
[ 44%] Building CXX object libgrive/CMakeFiles/grive.dir/src/bfd/Backtrace.cc.o
Linking CXX static library libgrive.a
[ 82%] Built target grive
Scanning dependencies of target btest
[ 83%] Building CXX object libgrive/CMakeFiles/btest.dir/test/btest/UnitTest.cc.o
[ 85%] Building CXX object libgrive/CMakeFiles/btest.dir/test/btest/ValTest.cc.o
/tmp/ccK8TOeR.s: Assembler messages:
/tmp/ccK8TOeR.s:1331: Warning: swp{b} use is deprecated for this architecture
[ 87%] Building CXX object libgrive/CMakeFiles/btest.dir/test/btest/JsonValTest.cc.o
/tmp/ccOAUEHb.s: Assembler messages:
/tmp/ccOAUEHb.s:1331: Warning: swp{b} use is deprecated for this architecture
Linking CXX executable btest
[ 87%] Built target btest
Scanning dependencies of target grive_executable
Linking CXX executable grive
[ 89%] Built target grive_executable
[ 91%] Generating src/moc_MainWnd.cxx
[ 92%] Generating ui_MainWindow.h
Scanning dependencies of target bgrive_executable
[ 94%] Building CXX object bgrive/CMakeFiles/bgrive_executable.dir/src/DriveModel.cc.o
/tmp/ccgDURnf.s: Assembler messages:
/tmp/ccgDURnf.s:1731: Warning: swp{b} use is deprecated for this architecture
[ 96%] Building CXX object bgrive/CMakeFiles/bgrive_executable.dir/src/MainWnd.cc.o
[ 98%] Building CXX object bgrive/CMakeFiles/bgrive_executable.dir/src/main.cc.o
[100%] Building CXX object bgrive/CMakeFiles/bgrive_executable.dir/src/moc_MainWnd.cxx.o
Linking CXX executable bgrive
[100%] Built target bgrive_executable
Well, now that that's over, the install process seems to need an extra doc, so we'll just add an empty one, which might not be necessary.
pi@raspberrypi ~/apps/grive $ mkdir /home/pi/apps/grive/bgrive/doc/
pi@raspberrypi ~/apps/grive $ touch /home/pi/apps/grive/bgrive/doc/grive.1
pi@raspberrypi ~/apps/grive $ sudo make install
Usage
First, set up a folder to sync your stuff to. Then you open a long authentication link in a browser and log in to your Google account. It will then give you a long code to copy back to the program. It is important that your current directory is the directory you wish to sync with your Google Drive before you do this.
pi@raspberrypi ~ $ mkdir ~/gdrive/ ; cd ~/gdrive
pi@raspberrypi ~/gdrive $ grive -a
-----------------------
Please go to this URL and get an authentication code:

https://accounts.google.com/o/oauth2/auth?scope=............

-----------------------
Please input the authentication code here:
XXXXXXXXXXXXXXXXXXXXXXXXXXXXXXXXXXXXXXXXXXXXXXXXXXXXXXXXXXXXXX
Reading local directories
Synchronizing folders
Reading remote server file list
Synchronizing files
... ... ... ...
Now, to set up automatic sync, it unfortunately has to be done this somewhat simplistic way:
pi@raspberrypi ~ $ mkdir ~/bin/
pi@raspberrypi ~ $ echo "#! /bin/bash
> cd ~/gdrive/
> grive" > ~/bin/gsync
pi@raspberrypi ~ $ chmod +x ~/bin/gysnc
pi@raspberrypi ~ $ crontab -e
*/10 * * * * /home/pi/bin/gsync
Now, your Google Drive will sync to your to your Raspberry Pi every 10 minutes. There might be a way to do this every time a file changes on the Raspberry Pi using inotifywait, but it would not sync changes from Google Drive until there is a change locally.
dropfuse
Dropfuse is not one of the best or most secure options, but Dropbox is a really nice service. Dropfuse is a third party script that relies on the "share link" feature. It does not actually connect to your entire Dropbox account. It will only connect to a single shared folder. Log onto dropbox.com, navigate to the folder you want sync'd and click "share link". You'll find a link like this:
https://www.dropbox.com/sh/AAAAAAAAAAAAAAA/BBBBBBBBBB
Modify the link yourself to this format:
https://www.dropbox.com/s/AAAAAAAAAAAAAAA
The install process is relatively easy.
pi@raspberrypi ~ $ sudo apt-get install python-pyquery
pi@raspberrypi ~ $ sudo usermod -a -G fuse pi
pi@raspberrypi ~ $ mkdir apps
pi@raspberrypi ~ $ mkdir Dropbox
pi@raspberrypi ~ $ cd apps
pi@raspberrypi ~/apps $ git clone git://github.com/arekzb/dropfuse.git
Cloning into 'dropfuse'...
remote: Counting objects: 38, done.
remote: Compressing objects: 100% (21/21), done.
remote: Total 38 (delta 19), reused 34 (delta 17)
Receiving objects: 100% (38/38), 14.16 KiB, done.
Resolving deltas: 100% (19/19), done.
pi@raspberrypi ~/apps $ cd dropfuse
sudo python dropfuse.py https://www.dropbox.com/s/c6ecc2plwconh5x ~/Dropbox &
To stop the service, do this:
pi@raspberrypi ~ $ fusermount -u Dropbox
BitTorrent Sync
A word of warning, btsync causes lots of networking issues. On an Ubuntu machine, it can cause 10% of your dns queries to timeout. The symptoms are less severe on a Windows computer, but still problematic for seemingly anything but web browsing, which seems unaffected. I cannot recommend BitTorrent Sync as a result, but maybe they will have patched it by the time you are reading this, so here goes.
In concept, this might be the best of any of the options. It is distributed and peer to peer. It deals with binary files well. You can share over the internet without DNS or public IPs. It is extremely simple to set up, despite what all is going on under the hood.
wget http://btsync.s3-website-us-east-1.amazonaws.com/btsync_arm.tar.gz
tar xzf btsync_arm.tar.gz
rm btsync_arm.tar.gz LICENSE.TXT
sudo ln -s /lib/arm-linux-gnueabihf/ld-linux.so.3 /lib/ld-linux.so.3
./btsync
Then just take a browser and visit http://raspberrypi.local:8888/.