Raspberry Pi Introduction
Raspberry Pi IntroductionSetup
The Raspberry Pi minimally needs a micro USB-B cord to power it. If you have a phone charger, aside from an iPhone, it will likely use this cable since the EU made it mandatory for smartphones. So, you probably don't even need to buy another wall adapter or cable if you look around. You can also plug it into a computer to power it, though you are not able to communicate with the computer over it. Additionally, an Ethernet cable connecting it to the same LAN as a computer is one of the easiest ways to get started. Unless you can figure out what IP address the Raspberry Pi will get, you will also need a keyboard and a monitor or tv capable of using either HDMI or the yellow RCA connector.
The Raspberry Pi does not come with an SD card, which you will also need. You will need to install an operating system on it as well, so it should be at least 4GB to be comfortable. Some SD cards are faster than others. Higher speed is denoted by a higher "class" number. This class will primarily effect install, startup, and upgrade times and there is no mandatory minimum.
SD Installation
Once you have it all set up, you will need to install the operating system to the SD card. I do not know of any reason not to use Raspbian unless you are both very experienced in Linux and already familiar with the Raspberry Pi (why would you be reading this?). Head over to the download page and get an up to date image of Raspbian. Then extract the .img from the .zip using whatever you usually use to unzip a file.
- Linux & Mac: sudo dd if=path_of_your_image.img of=/dev/XXXX bs=1M
- Windows: Use Win32DiskImager
Be extra sure to "eject" the disk after the imager is done regardless of the OS you use. You might be able to get away with it most of the time, but there will definitely be some changes waiting in the buffer even if you use dd.
Booting
Simply plug in the Raspberry Pi with the SD card and everything plugged into it. There is no power button. The default login username is "pi" and the password is "raspberry"
Raspbian GNU/Linux 7 raspberrypy tty1
raspberrypi login: pi
password:
It is completely normal for the password field to not show any of your typing. It is a security feature.
GUI
If you want to start into a graphical environment, all you need to do is type "startx" and then hit enter.
pi@raspberrypi ~ $ startx
Updating and Installing
Installing and upgrading things on your Raspberry Pi is really easy, but a little different than usual. The easiest way requires a little learning. If you don't want to learn the easy way, you'll still have to follow along a little bit.
First, open a terminal. You can get one either by not running startx after a boot, or by clicking LXTerminal on your desktop. This terminal is one of the reasons why Linux is so great for developers. Just about anything can be done from here easily once you know what to type.
pi@raspberrypi ~ $ sudo apt-get update
pi@raspberrypi ~ $ sudo apt-get install synaptic
The two commands above can be broken into parts. "sudo" says "do this as super user", which gives you administrative abilities for that command. "apt-get" is a program that manages software on the computer and can install or upgrade them from the internet. the "update" argument tells "apt-get" to check the server for new software, but not to actually upgrade or install anything.
The second command tells "apt-get" to "install" the software called "synaptic". The Synaptic Package Manager is essentially a graphical way to do the same thing as apt-get. It is probably not installed by default because it requires so many other programs be installed in order to work. apt-get automatically finds and installs these programs for you before installing synaptic.
If you don't want to learn this terminal based way of installing and updating things, you can just use Synaptic. "startx" if you haven't already, and click the icon in the bottom left and hover over "other" and scroll down to find "Synaptic Package Manager". From there, things should be pretty self explainatory.
Now, to upgrade all the software on your system at once, all you need to do is:
pi@raspberrypi ~ $ sudo apt-get upgrade
Just one command and everything installed on there can be upgraded to the newest version.
If you don't know exactly what you're looking for when you want to install something, you can find it relatively easily from the command line. The first thing you should check is not by opening a web browser and trying downloading the software. You will, first, probably not find anything compatible with your Raspberry Pi, and it will not be automatically updated if it were. Instead, try:
pi@raspberrypi ~ $ apt-cache search worms
atanks - tank-battling game
bsdgames - collection of classic textual unix games
hedgewars - Worms style game
labrea - a "sticky" honeypot and IDS
libspf2-2 - library for validating mail senders with SPF
libspf2-dev - Header and development libraries for libspf2
p3scan - transparent POP3-proxy with virus- and spam-scanning
spfquery - query SPF (Sender Policy Framework) to validate mail senders
warmux - turn-based artillery game on 2D maps
warmux-dbg - debugging symbols for the WarMUX game
warmux-servers - stand alone server and game index server for WarMUX
pi@raspberrypi ~ $ sudo apt-get install hedgewars
"apt-cache search" searches the descriptions of the easily available software. In this example, I wanted a game similar to Worms, and found hedgewars. Once you find what you are looking for, you use "apt-get install" to install the software.
Remote Access
Once you have things set up, you can access a command prompt to the Raspberry Pi from another computer by installing:
pi@raspberrypi ~ $ sudo apt-get install openssh-server avahi-daemon
This installs the openssh server, which is probably already installed, and the avahi-daemon, which lets you connect using the Raspberry Pi's name rather than the IP address.
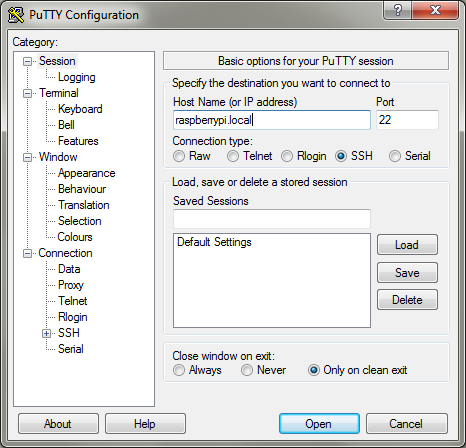
From the other computer, use either PuTTY or ssh if you are on Windows or Mac/Linux respectively.
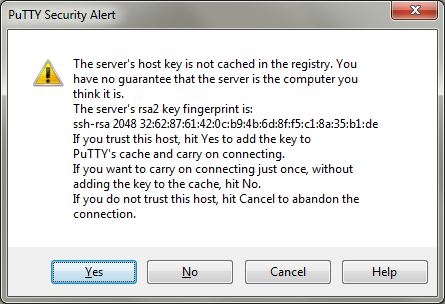
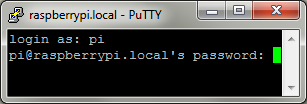
Windows does not resolve .local addresses by default. I believe this is solved if you even have so much as iTunes installed, but if not, you may have to install Bonjour. If you don't want to do that, you can follow the IP address method shown below. Once in putty, simply enter raspberrypi.local in the hostname field, or the IP if the .local name is not working. It will warn you about the fingerprints because you have not connected to this device before. Hit yes and PuTTY will remember this fingerprint for next time and warn you if it changes. Then login as "pi" and use the password "raspberry".
From Linux or a Mac, run the command:
ssh pi@raspberrypi.local
If you can't connect, try using the Raspberry Pi's IP address, which can be found by running the ifconfig command:
pi@raspberrypi ~ $ ifconfig
eth0      Link encap:Ethernet  HWaddr b8:27:eb:5d:a4:c8
          inet addr:192.168.1.101  Bcast:10.0.0.255  Mask:255.255.255.0
          UP BROADCAST RUNNING MULTICAST  MTU:1500  Metric:1
          RX packets:12776 errors:0 dropped:0 overruns:0 frame:0
          TX packets:3604 errors:0 dropped:0 overruns:0 carrier:0
          collisions:0 txqueuelen:1000
          RX bytes:12519918 (11.9 MiB)  TX bytes:625071 (610.4 KiB)